
Main Menu


Pages: [1] 2
Views: 1818
TONEX REVIEW
AI Machine Modeled tone creator, player, browser
TONEX by IK Multimedia
Review by Howard Worf for guitaristguild.com
Guitarist Guild would like to thank IK Multimedia for providing the licence to enable us to complete this review.
All of the opinions expressed in this review are mine and mine alone.
So another exciting launch from IK Multimedia – at least I think so. Can't afford a hardware modeller, but have a laptop and audio interface? This is where you go.
INTRODUCTION
First a few bits of technical stuff:
What you will need (other than a guitar, amp and computer of some description):
- An audio interface with at least two inputs (one Hi Z for your instrument) and two outputs.
- A decent microphone or 2
- A monitoring system of some kind, preferably full range with a flat response curve (FRFR).
- A Re-Amplification box if you need to match the output of your interface to amp input.
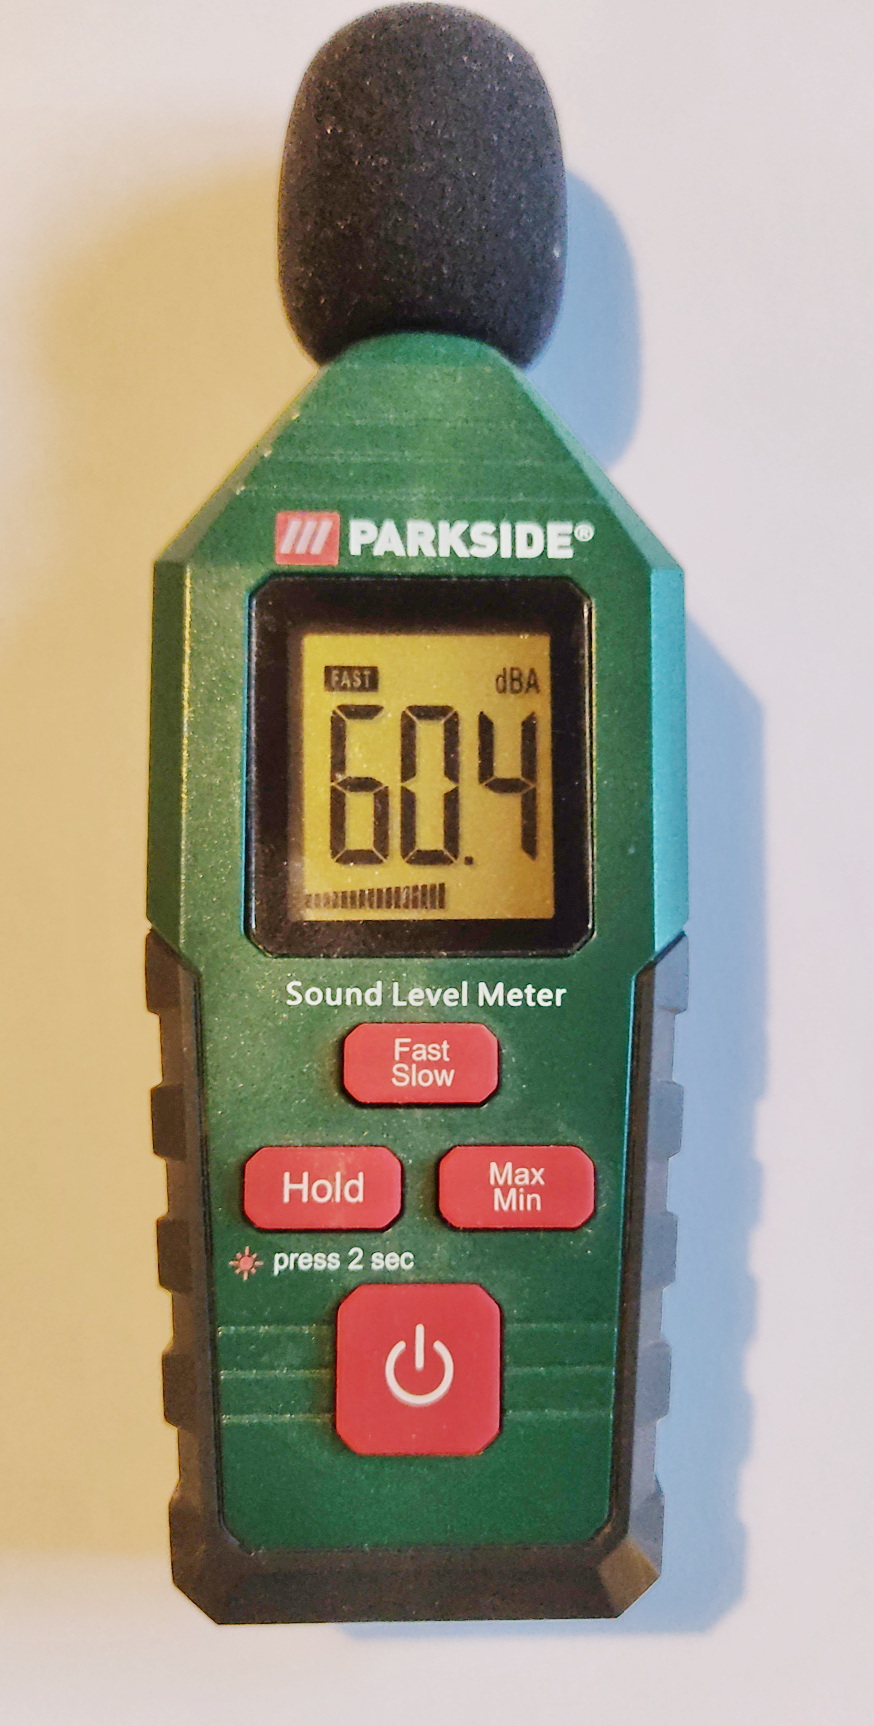
- Not on the list provided by IK Multimedia, but a decibel meter looks like a very useful if not essential addition to the equipment list for using the modeller.
Mac/PC/iOS for iPhone/iPad
Stand alone, VST, AAX for your DAW
Has it's own unique tone modelling
CS version 20 tone models -10 amps, 5 pedals
SE version 200 tone models -20 amps, 10 pedals
Standard 400 tone models – 40 amps, 20 pedals (at time of writing same price as SE version)
Max version – 1000 tone models, 100 amps, 50 pedals
No time based modulation available (reverb, delay, phaser, flanger etc)
Integrates with the latest iteration of Amplitube 5 (5.5.2)
Captures and models your own rigs, more of which later
Will only capture tone, so don't think about modelling any reverb, delay, phaser, flanger or anything of that ilk
To find a Tonex modelled amp in Amplitube select the Amp rack and scroll to the bottom, for a Tonex stomp choose the stomp rack (make sure you have the latest versions of both Tonex and Amplitube) and do the same. Tonex will now load.
CONCLUSION
I for one am ecstatic – I have been able to model the response from my favourite bass amp, an old Trace Elliot GP7SM200, and it's perfect. I've also captured some of my favourite tones from my Fender Mustang V2 and Zoom G3X. Processing a capture does take quite a while on my laptop (several hours) but the result is worth the wait. In a word, the models are astonishingly good.
Like all IK Multimedia's guitar software the library of sounds it is a lot of fun and delivers realistic tones. The included presets tend to be towards to the heavier end of guitar sounds. The clean tones are equally impressive even if clean tones can, in my opinion, almost always benefit from at least a little modulation which Tonex alone cannot provide. That said the reverb is extremely good. But you probably won't be using this as a stand alone application when recording, either running the tones through Amplitube 5 or your favourite DAW.
Once you have created a captured tone you cannot really alter it – so take care about the tones you map. My gut feeling is that it is best to just model the amplifier and cabinet, adding your preferred stomp boxes into the signal chain when playing either physically or through Amplitube, rather than model a particular stomp effect which you will not be able to alter in performance. There is, of course, nothing to stop you modelling just about any (non modulated) sound you can create with your physical gear.
The $64k question is should you buy this software? I think the answer has to be that if you are happy with Amplitube 5 and don't want to capture any additional tones you probably should not. Amplitube 5 is extremely versatile and customisable and will probably be all you need. But . . capturing and then being able to replicate your own tones anywhere is simply brilliant and once you have started you won't want to stop.
GETTING STARTED
You will need IK Multimedia's Product Manager. If you have any other IK Multimedia's products make sure they are all up to date. Tonex will only integrate with the latest version of Amplitube. You might wish to update Amplitube 5 after you install Tonex – there is some suggestion on the web that doing it the other way around won't work, although it did for me. Installing on my Windows 10 laptop involved having to go to the download temp file and run the installer as administrator.
The style of the UI will be familiar to you if you have used Amplitube, the same dark greys and white text. By default the application opens with the Audio settings/account/info window. The audio setting options I found a little strange.

If I chose the windows audio option from the Technology drop down menu the ASIO interface appears as an option, but the interface itself does not, just generic ASIO.

If instead I chose ASIO then with the Behringer the input device is automatically the UMC ASIO driver.
The default buffer size for my systems is 512 which works. I did experiment with 256 and that seemed to work well too. But there was nothing much to be gained from doing so. So I stuck with the default 512 and left it at that.
GETTING SOME TONES
After setting up your audio interface you'll want to start exploring the tones. Thanks to ToneNET these are legion, although the max pack come loaded with more than a thousand models
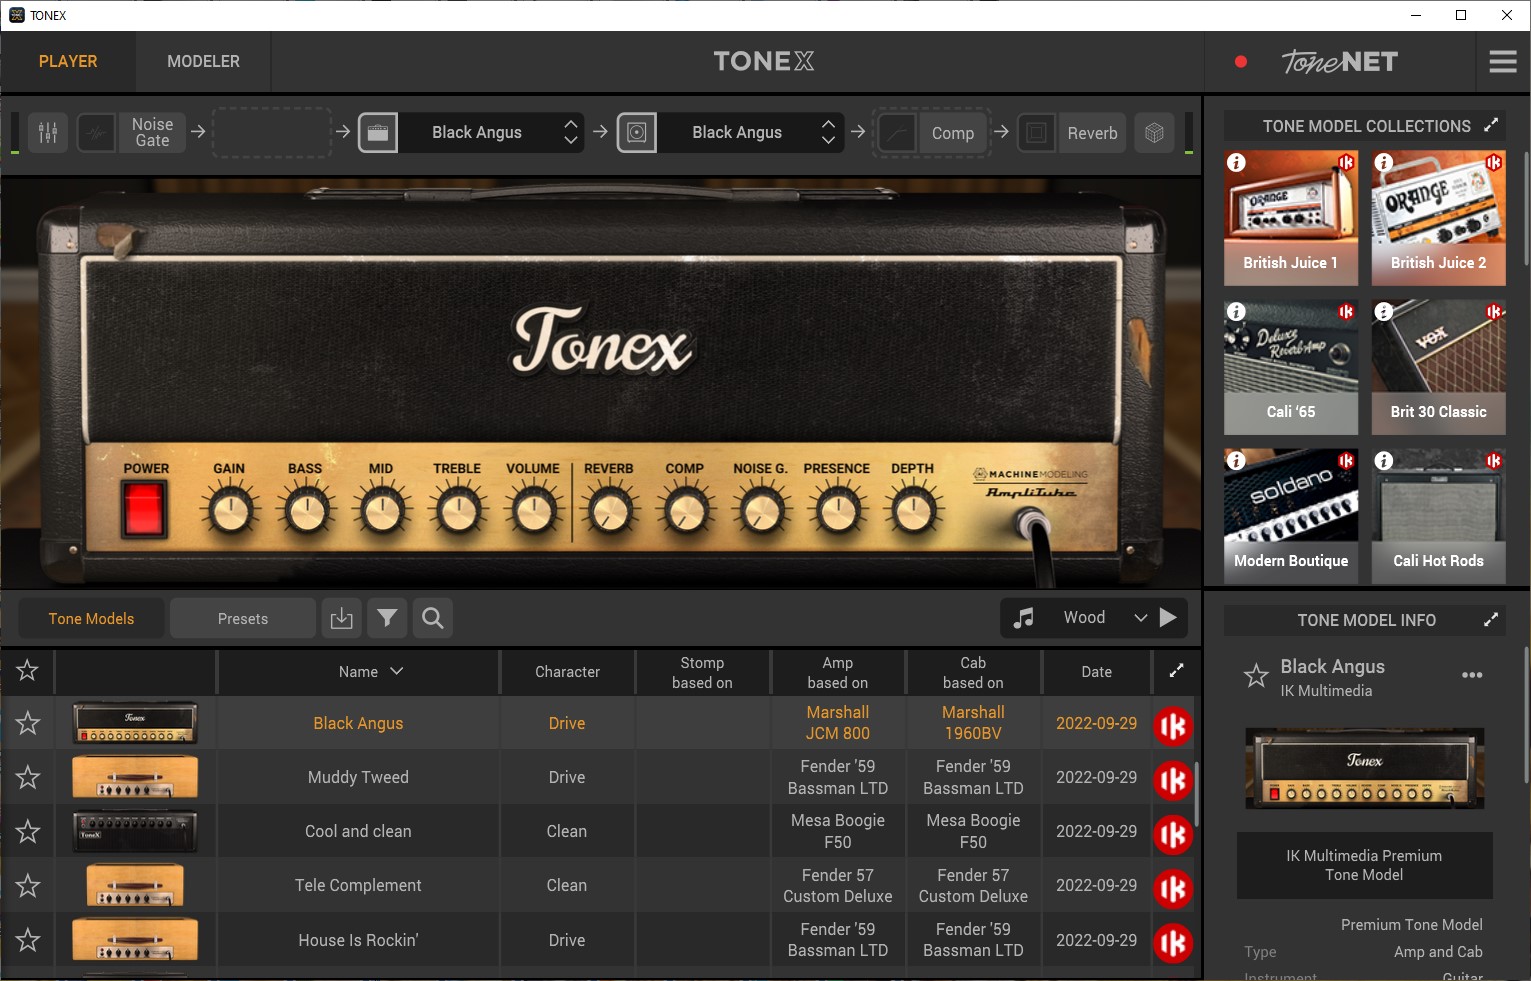
When you open the app you are using the start up tone based on a Marshall JCM800. What's not to like?
- Filter using the funnel symbol and choosing the features you want to see.
- Search directly using the magnifying glass symbol
- Sort any of the columns into alphabetical order
- Show only your favourites
TONE MODELS
Tone models are just that – the unadulterated models. The descriptions are self evident so I shall not dwell on the various columns, except to say that the first column is where you can mark favourite tones, making them easy to recall the ones you like the most. In the top right hand corner you can see the Tone Models Collections window. There are a lot more than the 6 you can see – scroll down for loads more. Very helpful as a starting point navigating the huge choice and variety of tone models available.
Beneath that is a window giving the details of the tone model.
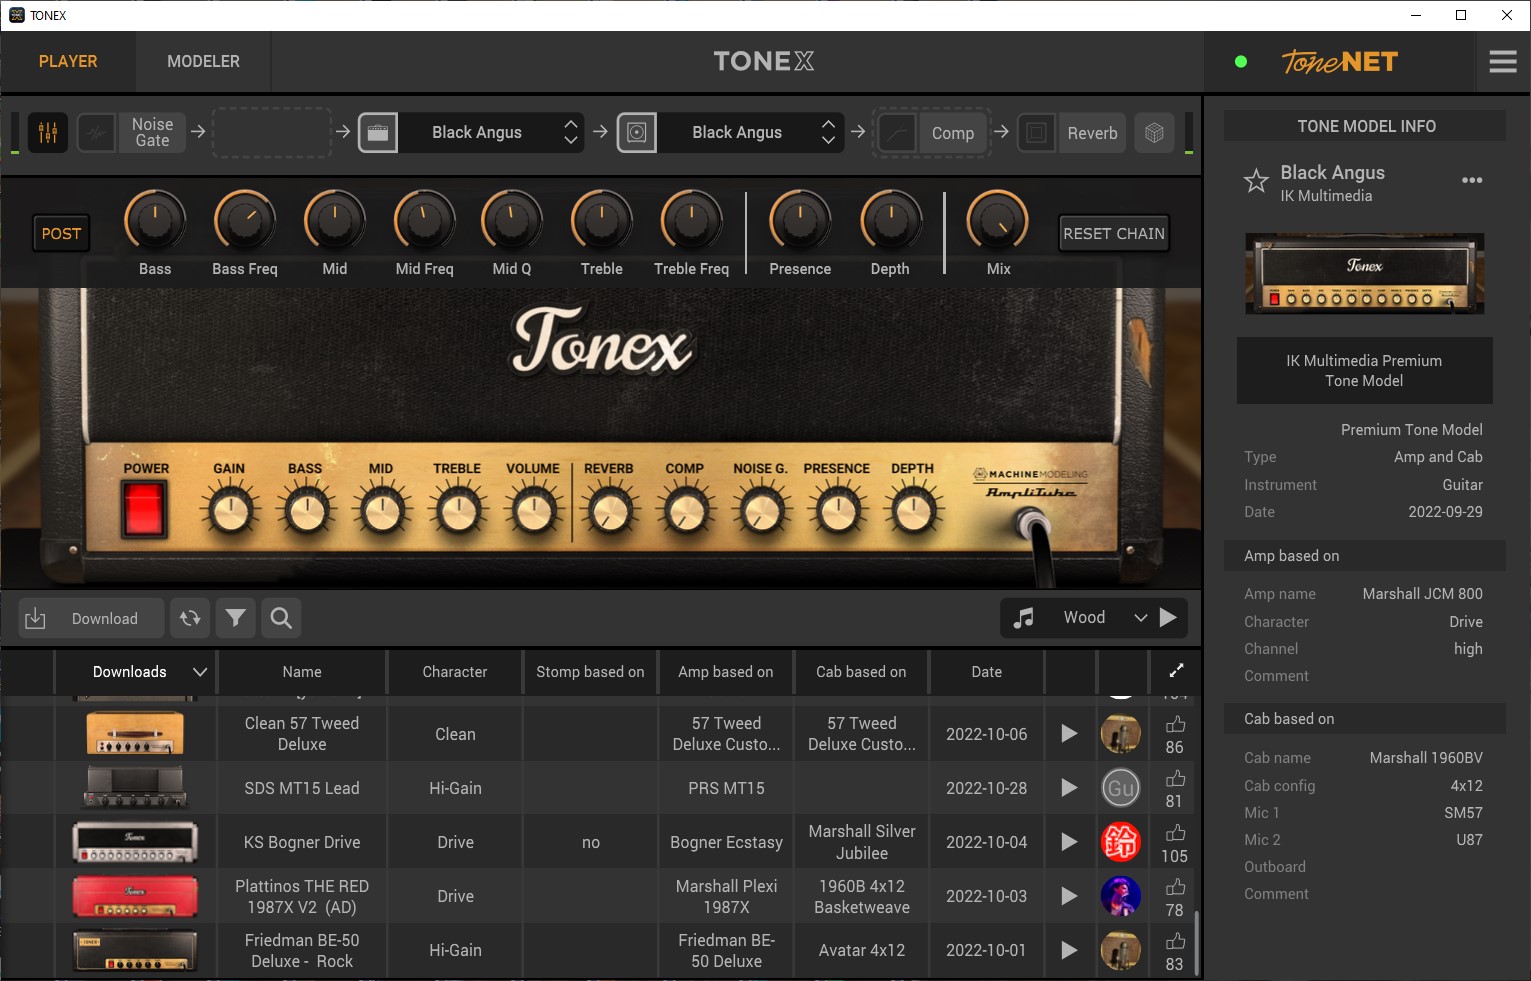
The top bar contains controls for the EQ, noise gate, amp model choice, cab choice, compression, reverb and microphone choice and placement. Note that there is no window for stomp – in the Tone Models window stomps cannot be changed. The elements that are active for each model or preset are shown in white. Play with these as you wish, turn them on and off, alter the parameters.
The effects signal chain will change depending upon whether the EQ and/or compressor are set to pre or post relative to the tone module (amp and cab). The noise gate is always at the start and reverb always at the end.
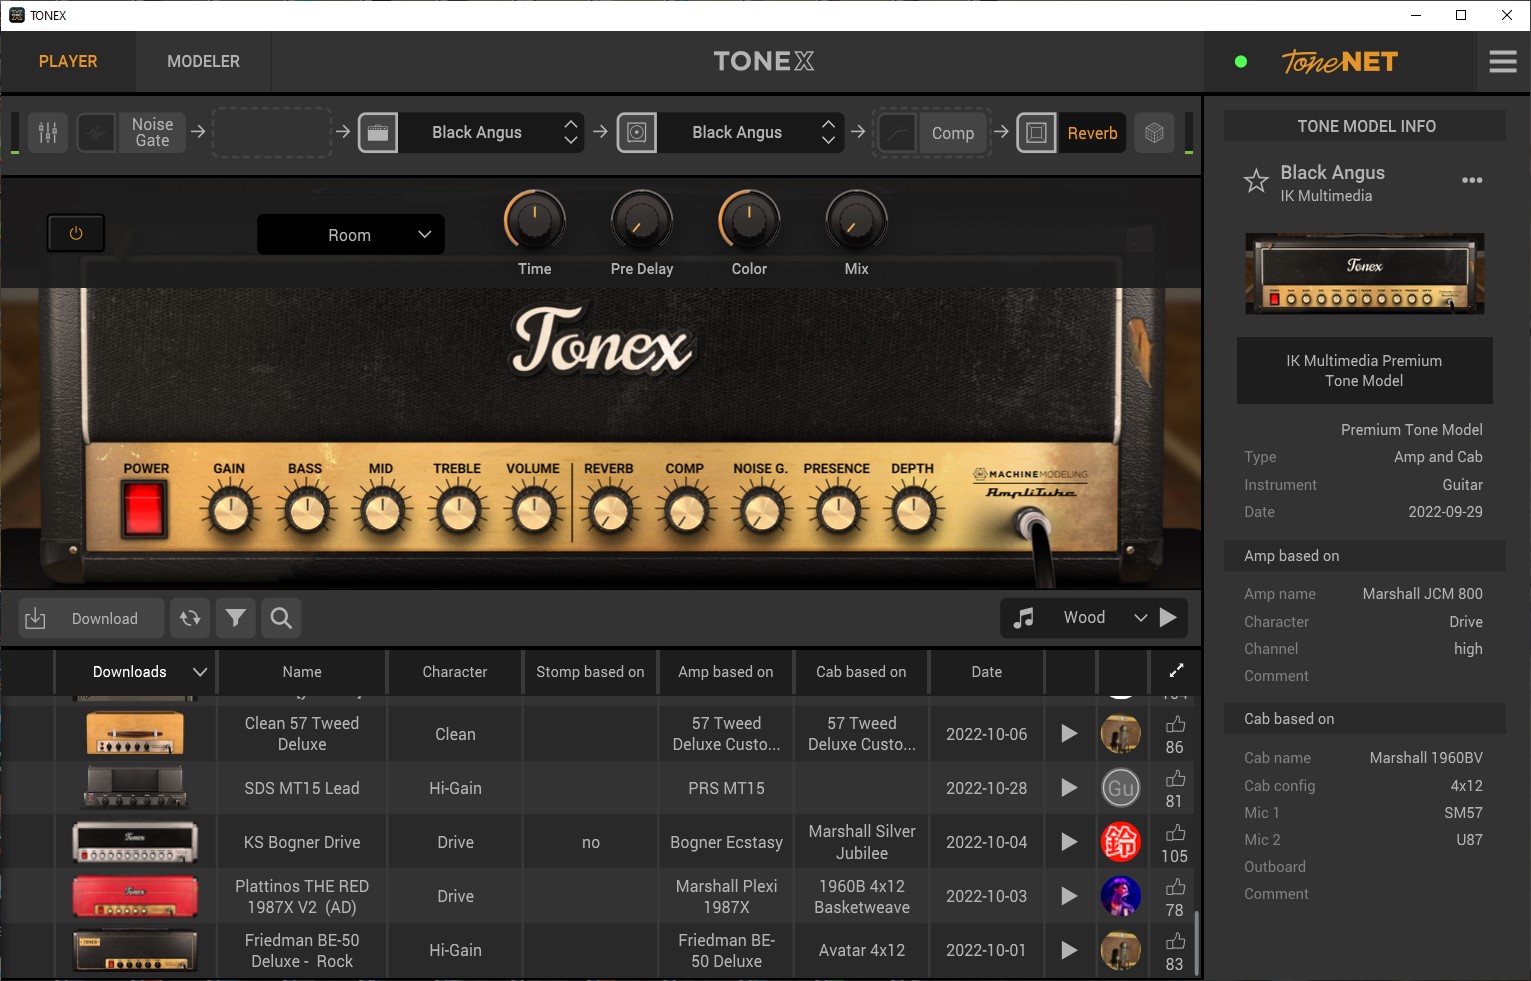
At this juncture I would like to say how excellent I found the reverb to be: smooth, open, very realistic – a gem. You can, of course, save any changes you make (open box with down arrow next to the Presets button) but note your modified tone becomes a preset.

A couple of screenshots of the controls for the EQ and the reverb:
PRESETS
This is the other tone area. These are modelled tones with various tweaks. Again the signal paths are altered by setting EQ and/or compressor to pre or post the amp and cab. The window is a little different from the Tone Models window, in the that second column now shows the preset signal chain. You can modify the effects chain in the same way as with the tone models. The search functions are the same. Again, you can favourite the tones you like the best in order to load them quickly again.

TONENET
This is IK Multimedia's huge online tone and preset library for both Tonex and Amplitube 5. I will not go into detail here other than in how it enables you to share your modelled tones with the world and download and use the thousands of others provided by the community of users. You connect by clicking in the ToneNET box and when you have a successful connection the red indicator turns green. You can now exchange tones with the world. Downloaded tones are added to your local library.
MODELLING
Let's face it, this feature is most likely the reason why you are are interested in Tonex.
It's quite a process, but the UI guide is very clear, just make sure you read it carefully as you go along. Here is how it works:
You MUST have
- A guitar or bass
- An amplifier
- A speaker cabinet (or both in a combo)
- A computer (or iPad/iPhone – I do not have either so can't comment on their functionality)
- An audio interface with at least 2 inputs and 1 output – I used a Steinberg UR22 for modelling with my laptop (I did not always use my re-amp box and could not tell much, if any, difference in the resulting tone models with my old ears)
- A decent microphone or two
You might like to have
- A decibel meter – Amazon sell one for less than €30. For this use it does not have to be a calibrated meter. Mine was from Lidl (I couldn't find my calibrated one).
- A re-amplification box to match input to your amp. Tonex Capture from IK Multimedia is €299 including VAT, including Tonex SE (on it's own €179.99 including VAT) with 200 tone models. The Palmer DACCAPO is €79 from Thomann.
- A DI box if you aren't using a microphone or a DI output from your rig.
- A boom microphone stand or two
Having gathered your items together there is some wiring to be done.
Connect your interface to your computer and make sure that you have selected the correct audio device from the Tonex audio interface page. If you can't see it, click on the 3 horizontal lines to the right of the ToneNET logo in the top right of the UI.
Set up your guitar and amplifier/cabinet and place your microphone or microphones (if using more than one your interface has to have 3 input channels).
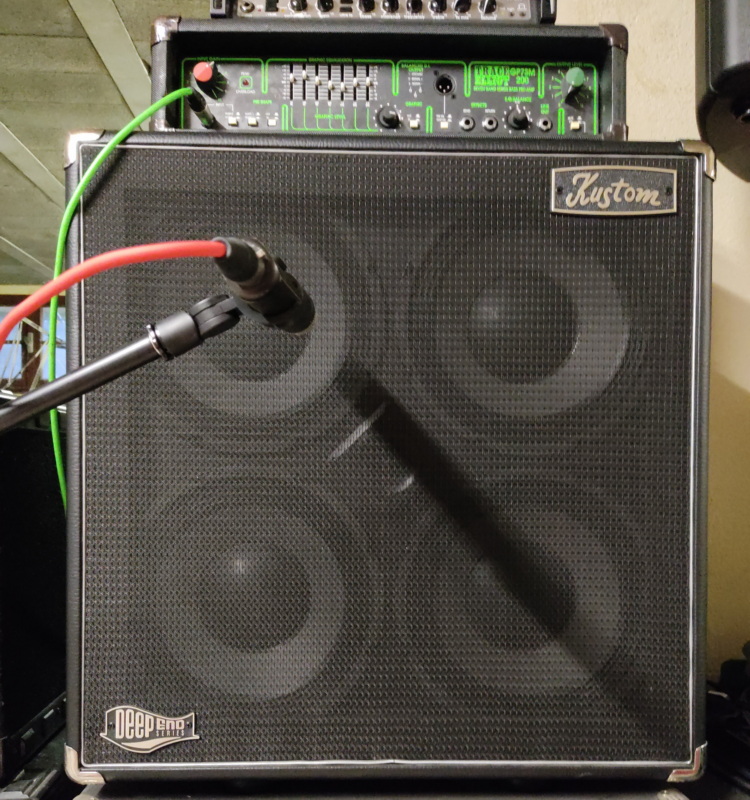
Play your instrument through your rig as usual and measure or gauge the volume – this is important and not mentioned in the instructions until you are some way through the process.
Open the Tonex Modeller
You will see the welcome screen – click next and you will have the choice of guitar or bass as source.
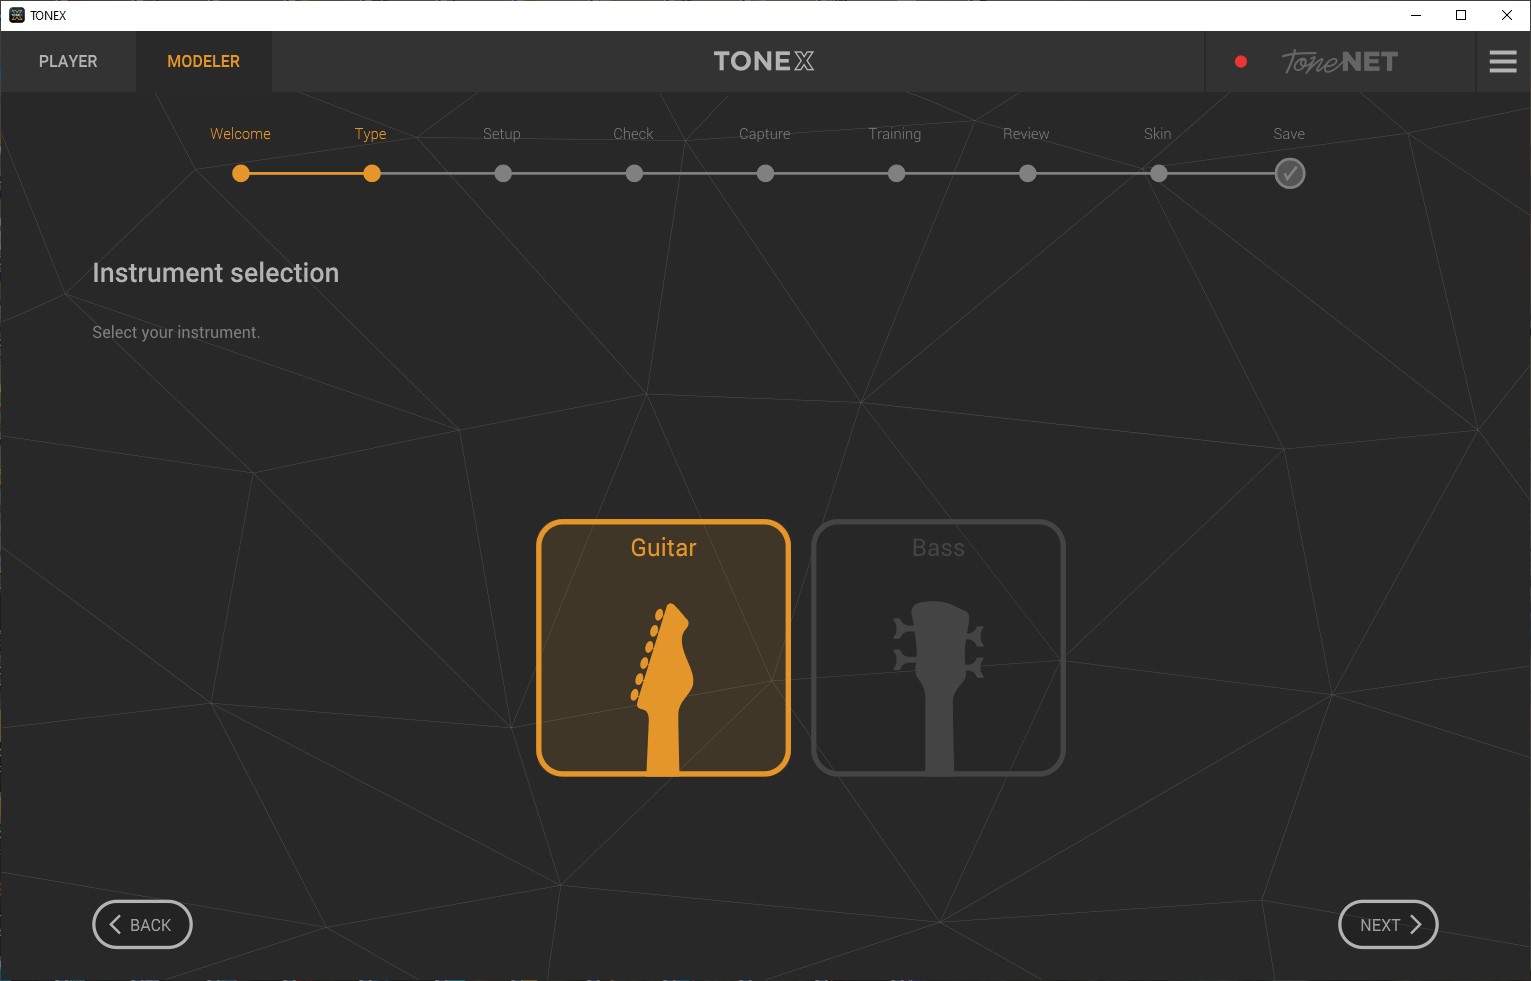
Make your selection and then move on to the next screen.
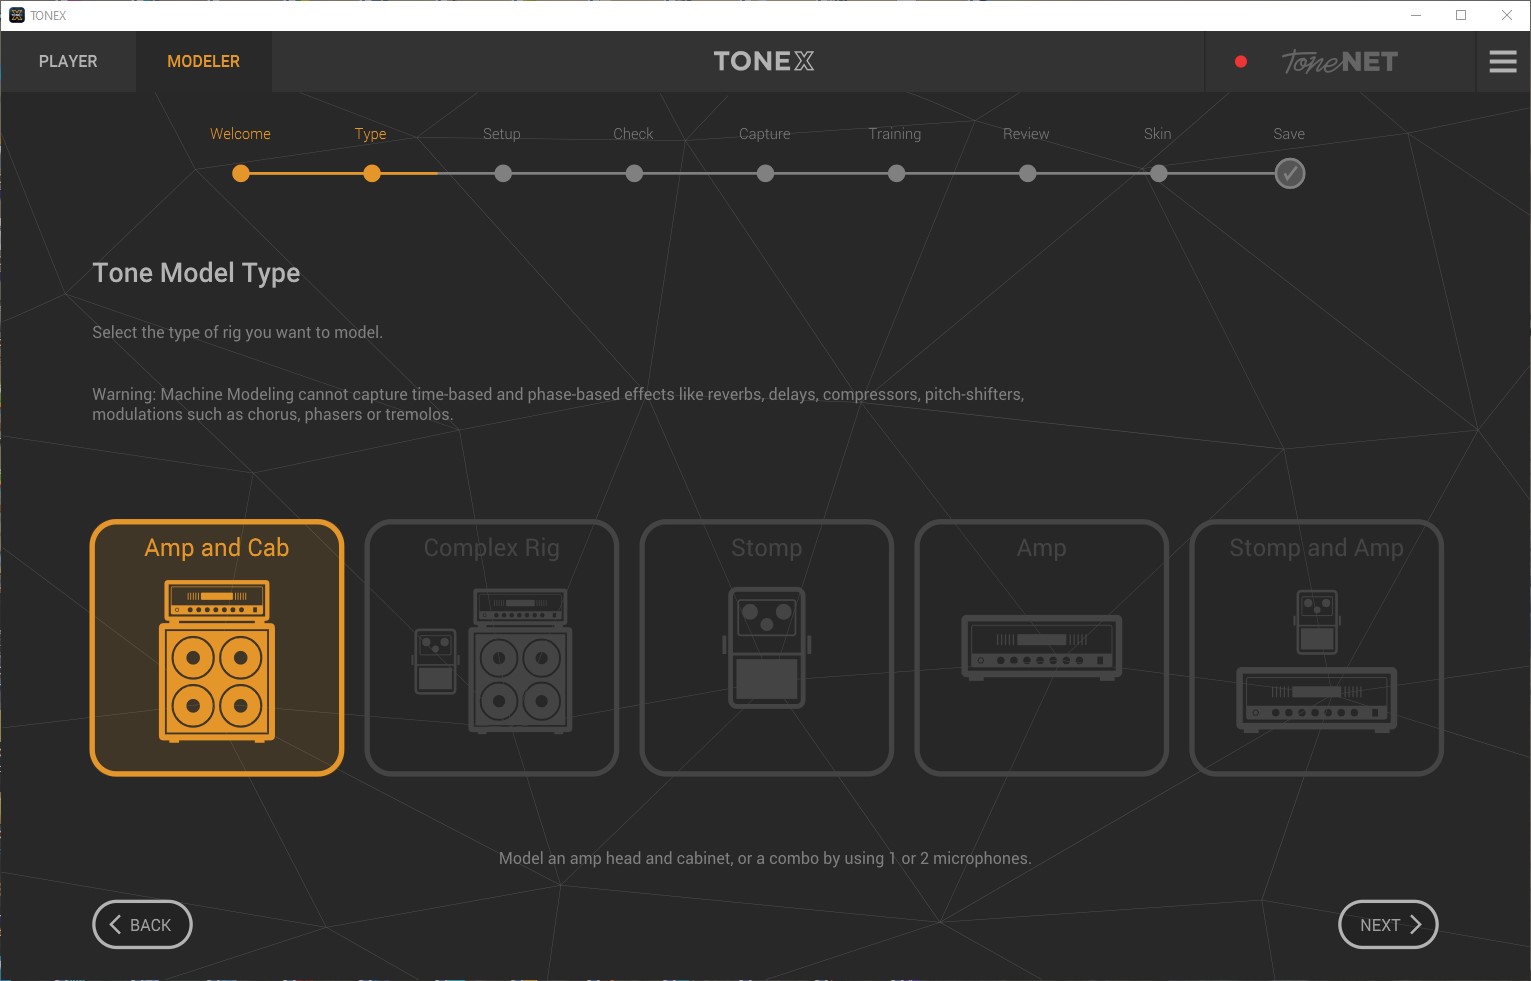
The next page asks you select your rig. Self explanatory.
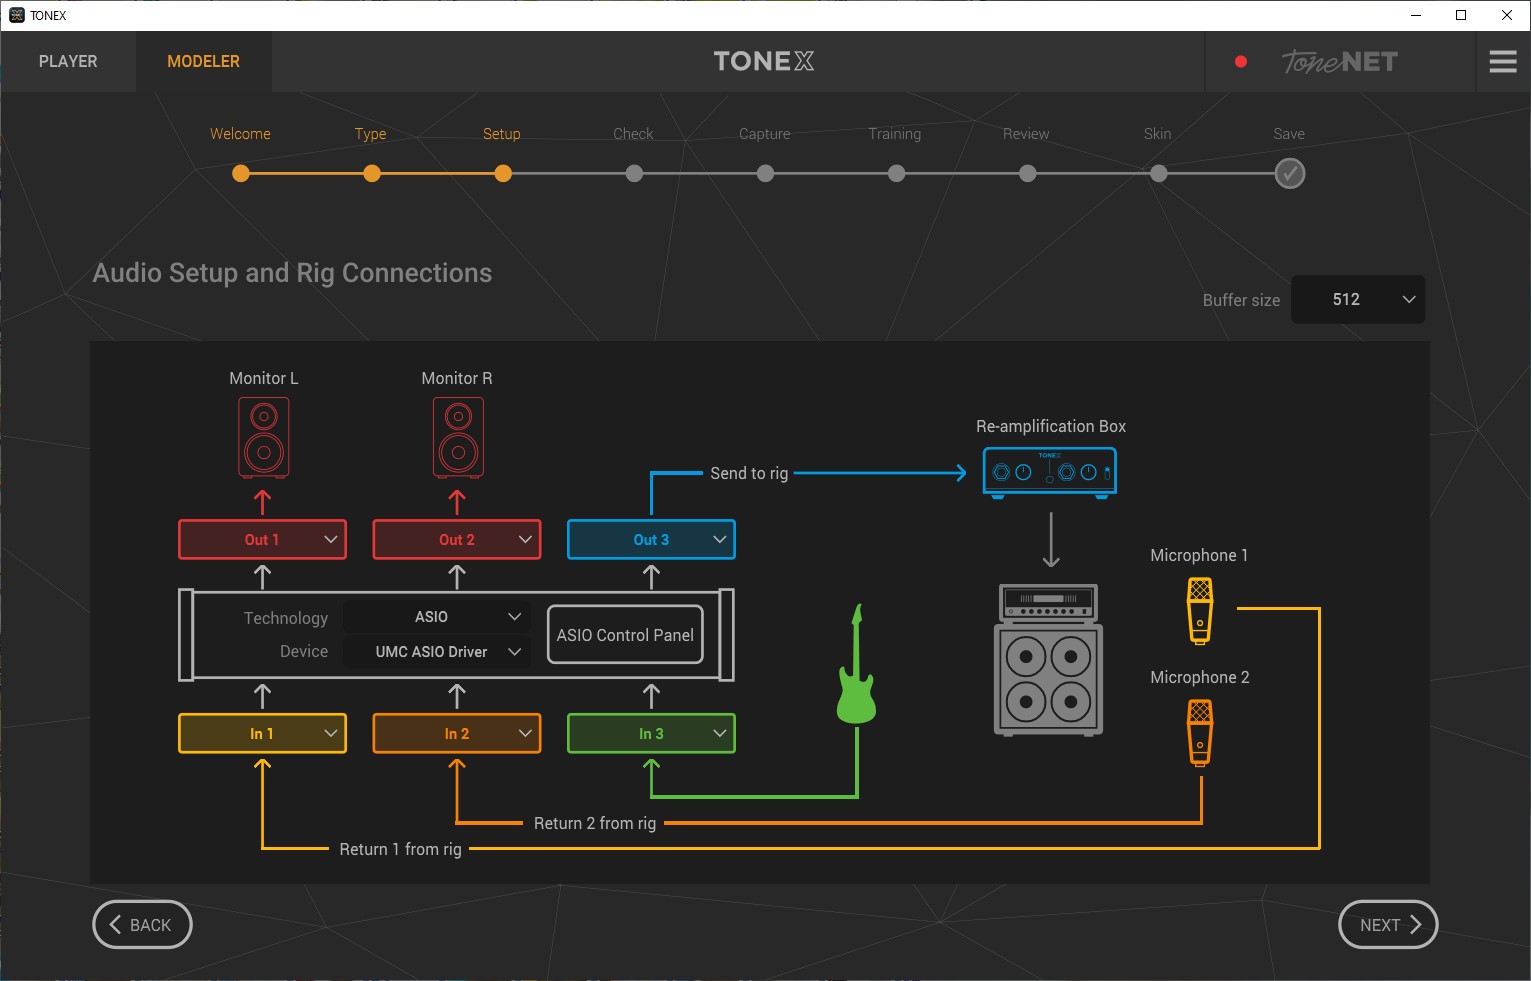
In the next window – setup you tell Tonex about your signal path – which inputs you have the microphone and instrument plugged into, which outputs are going to the monitors and which output is your return to rig. I did not always use the re-amplification box and if you don't just imagine that the send to rig path is only going to the input on your chosen rig. Example UR22:
Example UMC404HD:
Next up is setting the instrument input level. Note the direction to use a Hi-Z input. If your guitar or bass is active you may have to use a pad cut. I found this was not necessary using my interfaces as there was sufficient headroom in the Hi-Z gain controls.

Play your instrument to set the input levels. The meter will turn red if the levels are too high.
On the next page you have to set the send level to your rig (via the interface output and/or re-amplification box) to match the levels you get when playing directly through your rig. Hence my suggestion that you start by playing your instrument through your rig and establishing the volume level – I found the decibel meter to be invaluable for this.
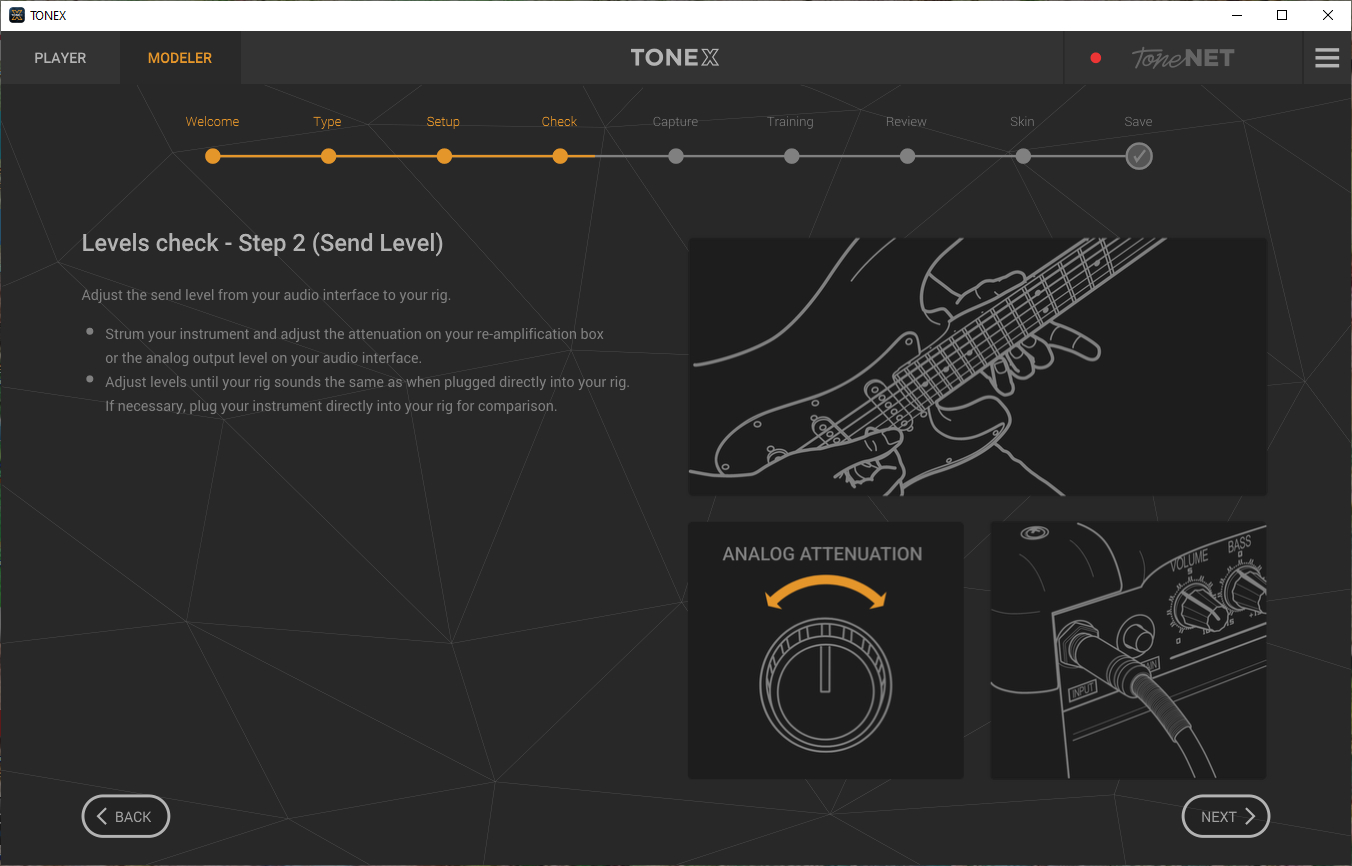
(As an aside, I found that I couldn't model DI direct from Ampeg's DI out – high noise levels reported that would affect the accuracy of the model, so I miked it up instead)
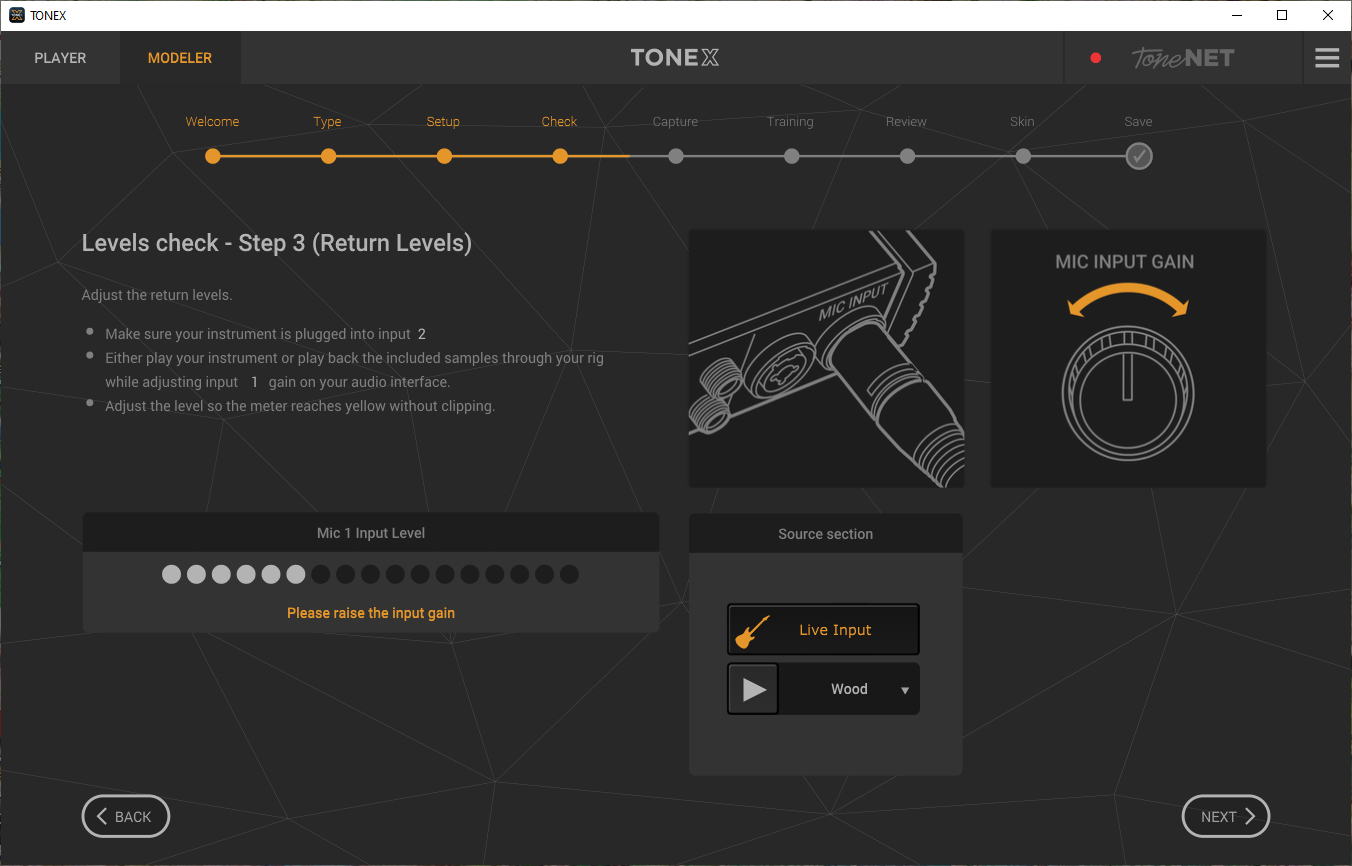
The next page is the return levels, the levels coming into the interface from your microphone(s). Here I suggest that you use one of the installed samples from the drop down box. For guitar I used 'space' and for bass 'bass'.
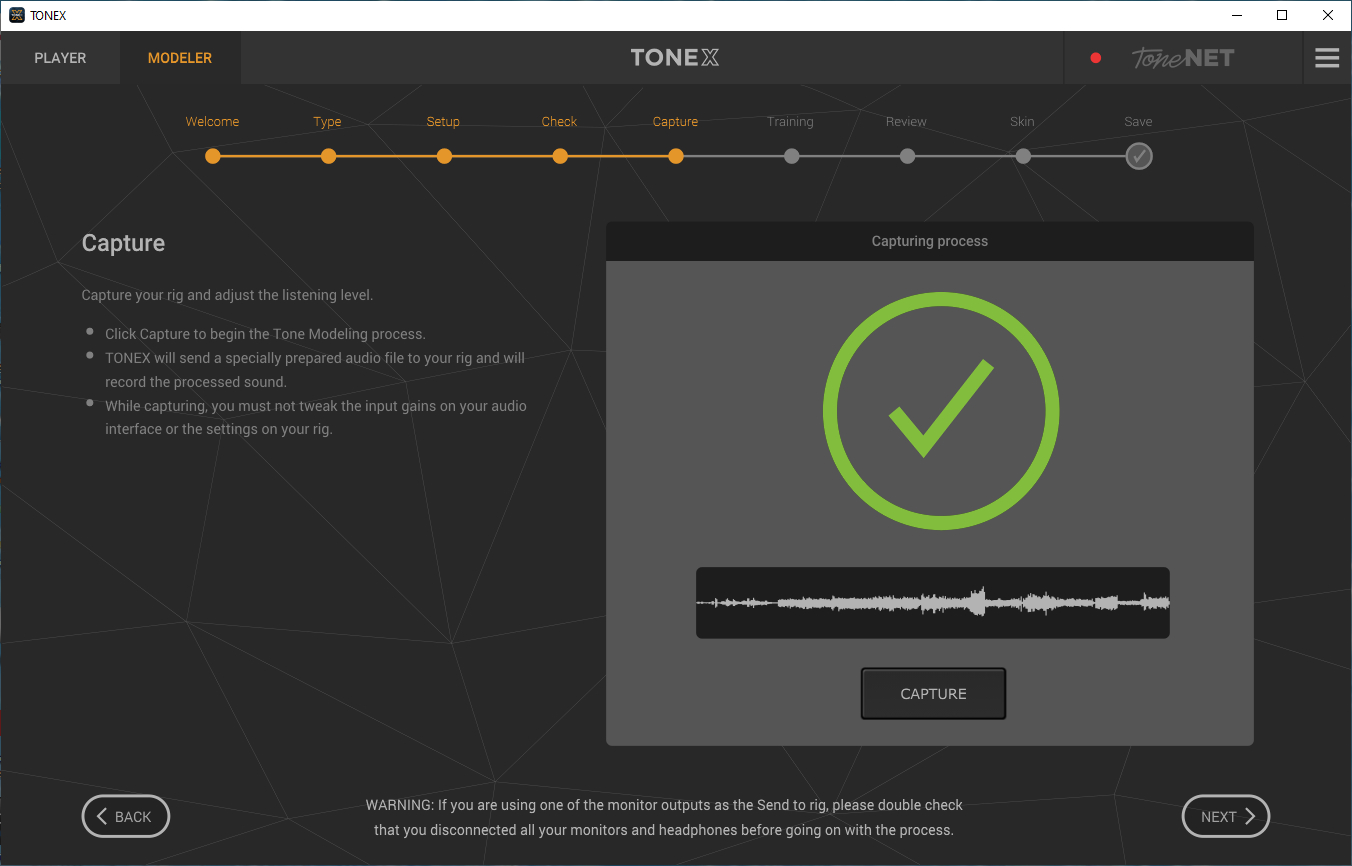
Having set the return levels you move onto capture.

Click the 'capture' button and Tonex will start playing its modelling tone set through your rig. As it does so the capturing process circle will advance clockwise filling with green until the capture is completed.
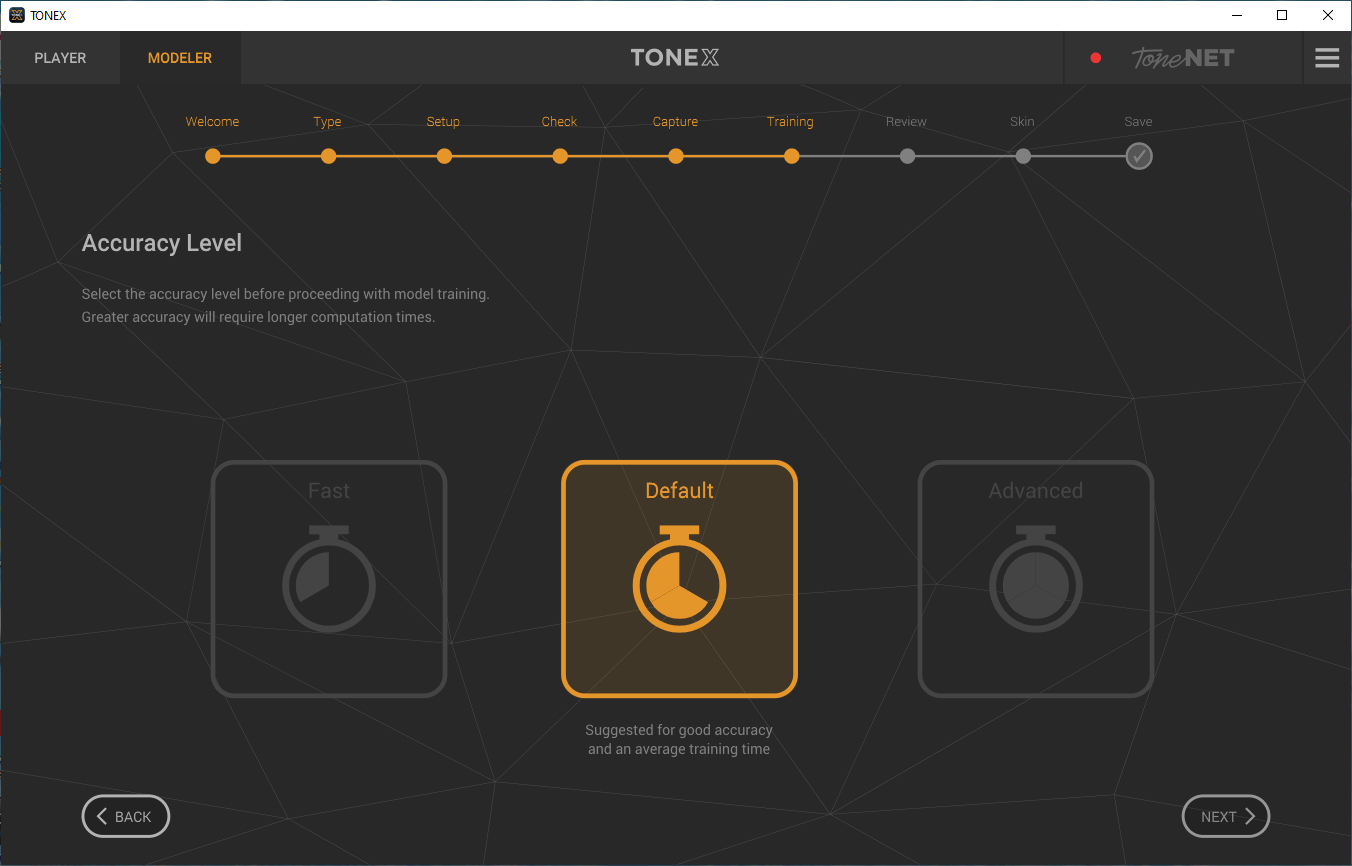
The AI will run,

and when completed you will see this window:
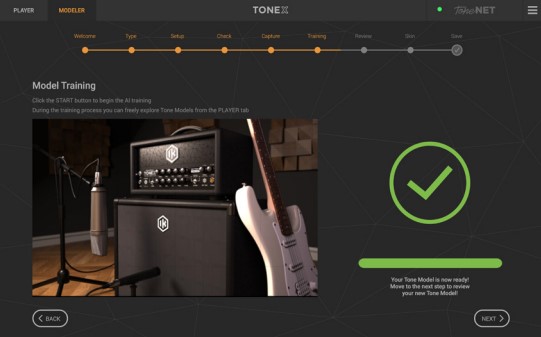
With the AI training has finished you can audition the newly created model before saving it. You might have to remove the connection path that goes from your interface to the amplifier and replace it with a path to your monitors – as below with the UR22.


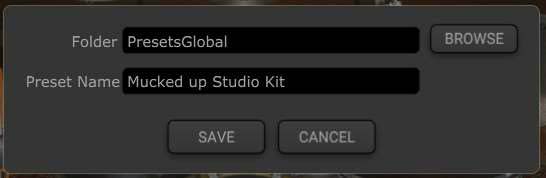
The last thing to do is to save your model. Here is a screenshot of the page for saving one of my favourite tones from the venerable Zoom G3X:

Click on save and go to the player. Enjoy your new sound.
If you are so inclined you can now upload this to ToneNET – choose an appropriate demo sound – I use 'space' for guitar and 'bass' for bass. The choice is yours.
You can play with some of the tones I created for this review by opening ToneNET and searching for 'H the Bass'.
Things used in this review:
PCs: 9 year old desktop AMD FX8, 16gb ram, laptop ASUS VivoBook 15, 6gb ram
DAWs – Cubase Pro 11 (12 won't run on my old desktop), Studio One 5 Professional, and Reaper 6.71
Monitoring – Behringer Truth B2031A near field, AKG K240 headphones
ASIO Interfaces – Steinberg UR22, Behringer UMC404HD
Re-Amplifier – Palmer DACAPPO
DI Box – Behringer DI 100 Ultra DI
OS – Windows 10 Home
Amplifiers – Combos: Fender Mustang 3 V2, Fender Champion 100 2x12, Heads: Ampeg Portaflex 500, Trace Elliot GP7SM200
Cabinet – Kustom DeepEnd 4x10
Guitars - Epiphone Prophecy GX, Schecter Banshee Diamond Extreme, Schecter Omen 6, Harley Benton Fusion Pro ll HH, Ibanez SG300EB, and Marcus Miller M7 V2
PA – Mixer (run flat) Behringer PMP6000, and the Box PA302s.
CONCLUSION
I for one am ecstatic – I have been able to model the response from my favourite bass amp, an old Trace Elliot GP7SM200, and it's perfect. I've also captured some of my favourite tones from my Fender Mustang V2 and Zoom G3X. Processing a capture does take quite a while on my laptop (several hours) but the result is worth the wait. In a word, the models are astonishingly good.
Like all IK Multimedia's guitar software the library of sounds it is a lot of fun and delivers realistic tones. The included presets tend to be towards to the heavier end of guitar sounds. The clean tones are equally impressive even if clean tones can, in my opinion, almost always benefit from at least a little modulation which Tonex alone cannot provide. That said the reverb is extremely good. But you probably won't be using this as a stand alone application when recording, either running the tones through Amplitube 5 or your favourite DAW.
Once you have created a captured tone you cannot really alter it – so take care about the tones you map. My gut feeling is that it is best to just model the amplifier and cabinet, adding your preferred stomp boxes into the signal chain when playing either physically or through Amplitube, rather than model a particular stomp effect which you will not be able to alter in performance. There is, of course, nothing to stop you modelling just about any (non modulated) sound you can create with your physical gear.
The $64k question is should you buy this software? I think the answer has to be that if you are happy with Amplitube 5 and don't want to capture any additional tones you probably should not. Amplitube 5 is extremely versatile and customisable and will probably be all you need. But . . capturing and then being able to replicate your own tones anywhere is simply brilliant and once you have started you won't want to stop.
System Requirements
TONEX for Mac/PC
TONEX for Mac/PC is a 64-bit application and requires a 64 bit CPU and Operating System.
Mac®
Intel: Intel® Core™ i3 (Core i5 recommended for Modeler), macOS® 10.11 (macOS® 11 Big Sur required for Modeler), 4 GB of RAM, 6 GB of hard drive space
Apple Silicon: Apple M1, macOS® 11, 4 GB of RAM, 6 GB of hard drive space. TONEX is a native Apple Silicon application.
Supported Plug-in formats : Audio Units, VST 2, VST 3, AAX.
Windows®
Intel: Intel® Core™ i3 or equivalent CPU (Core i5 recommended for Modeler), Windows® 10, 4 GB of RAM, 6 GB of hard drive space, NVIDIA GPU with Maxwell or newer architecture is recommended to reduce training times (eg. GeForce GT 750 or higher).
Supported Plug-in formats (64-bit): VST 2, VST 3, AAX.
Internet connection is required to authorise the application and access ToneNET.


Views: 10126
AMPLITUBE 5 REVIEW (INCLUDING MAX COLLECTION)
New from IK Multimedia is version 5 of their popular AmpliTube application, stand alone and VST/AAX plugins.
An in-depth look at IK Multimedia's AmpliTube 5 software. Tested reviewed by Howard Worf, for us here at Guitarist Guild.
I stress that the opinions following are mine alone and based upon my personal experiences in a home studio and running the PA in my basement. CONCLUSION:
The more I use it the more I like AmpliTube 5. The MAX version is absolutely awesome.
If you want to have a whole universe of sounds at your whim, think about getting an iRig Stomp controller, AmpliTube 5 MAX (or AmpliTube 5 which can be bundled with a iRig controller - €349.99 plus tax and save money), your laptop and a full range combo like a Harley Benton* G212AFR - €285 including VAmplitube . Realistically for what you would pay for a decent 100w mono combo you can have it all. Quite tempting?
For Reaper (which has no amp simulation built in) and Studio One (where the built in simulations are very limited) AmpliTube 5 it is an obvious top of the range add-on for recording. In Cubase the decision is a little less clear cut, but if you want stunning accuracy in your emulations and extremely fine and sophisticated control over your sounds the it is the thing to go for.
I do not think MAX is for everyone. The SE or 5 versions seem to me to be the ones that would be the optimal choice for most users. Any additional gear models you fancy can be tried before buying in the new version of Custom Shop. Better value unless you simply must have everything.
MAX PACKAGE BREAKDOWN:
107 amplifier models, 107 stomp models, 101 speaker cabinet models, 331 speaker driver models, 18 different microphone models, 44 rack effects, 8 different room layouts. And 600 impulse response models.
INITIAL THOUGHTS AND TEETHING TROUBLES:
I suspect this had been released to meet a deadline before it was entirely ready. There are reports of incompatibility issues, particularly with laptops where it seems many users can't get it to start.*
I have not had that issue with my laptop installation, perhaps because my laptop has a 1080p display. I have, however, had other issues.
• The download size is 2.4gb – this is everything available within AmpliTube 5, so even if you just want to try the free to AmpliTube 4 owners 'Custom Shop' version you have to download the whole lot (MAX)
• The Product Manager repeatedly crashed on my desktop, and stopped frequently during downloads on my laptop – requiring manual restarts
• Cubase 10.5 didn't recognise the VST3 plugin at all. Cubase is my main DAW.**
• Quite large variations in the apparent volumes of the presets
• Slow to load on both my older desktop PC and new Ryzen 7 laptop, although the latter is obviously noticeably faster than the desktop
• There have been complaints that previously purchased gear from AmpliTube 4 is not available in Amplitube 5. I had this issue, only to find that my Engl Powerball, in AmpliTube 4 called 'Engl Powerball' is labelled 'Powerball' in AmpliTube 5, so searching for Engl, which is what I did, produces no results. I had almost completed my support request when I found it by accident.
• Can be resized within a DAW. Click and drag the small triangle symbol on the bottom right hand corner – very useful
• T-Rack derived studio effects added - excellent
*Fixed in release 5.0.1 for laptops with 1400 px screens. Now opens beyond full screen size on my 1080p laptop.
**Fixed in release 5.0.1 – Cubase Pro 11 now running the VST3
WHAT HAVE WE GOT?
4 versions:
• Custom Shop – free – 39 models
• SE - €149.99 plus VAT – 77 models
• 5 - €199.99 plus VAT – 177 models
• MAX - €399.99 plus VAT - more than 400 models including with 11 artist signature packs – the version provided for this review and the best bang for your buck if you simply must have everything
• Various packs with AmpliTube 5 and bundled hardware
• At the time of writing there are substantial launch discounts available – check IK Multimedia's site for details.
A completely redesigned interface, both stand alone and as a plugin – a more modern look
Drag and drop gear and edit signal paths
4 different signal path designs
New mixer section – which I think is a really worthwhile addition
Much improved looper (stand alone implementation)
Transfer of models purchased in AmpliTube 3/4 to AmpliTube 5
Studio effects units based upon T-Racks – really very good indeed
It could be my old ears, but the modelling sounds smoother and more accurate, especially the effects.
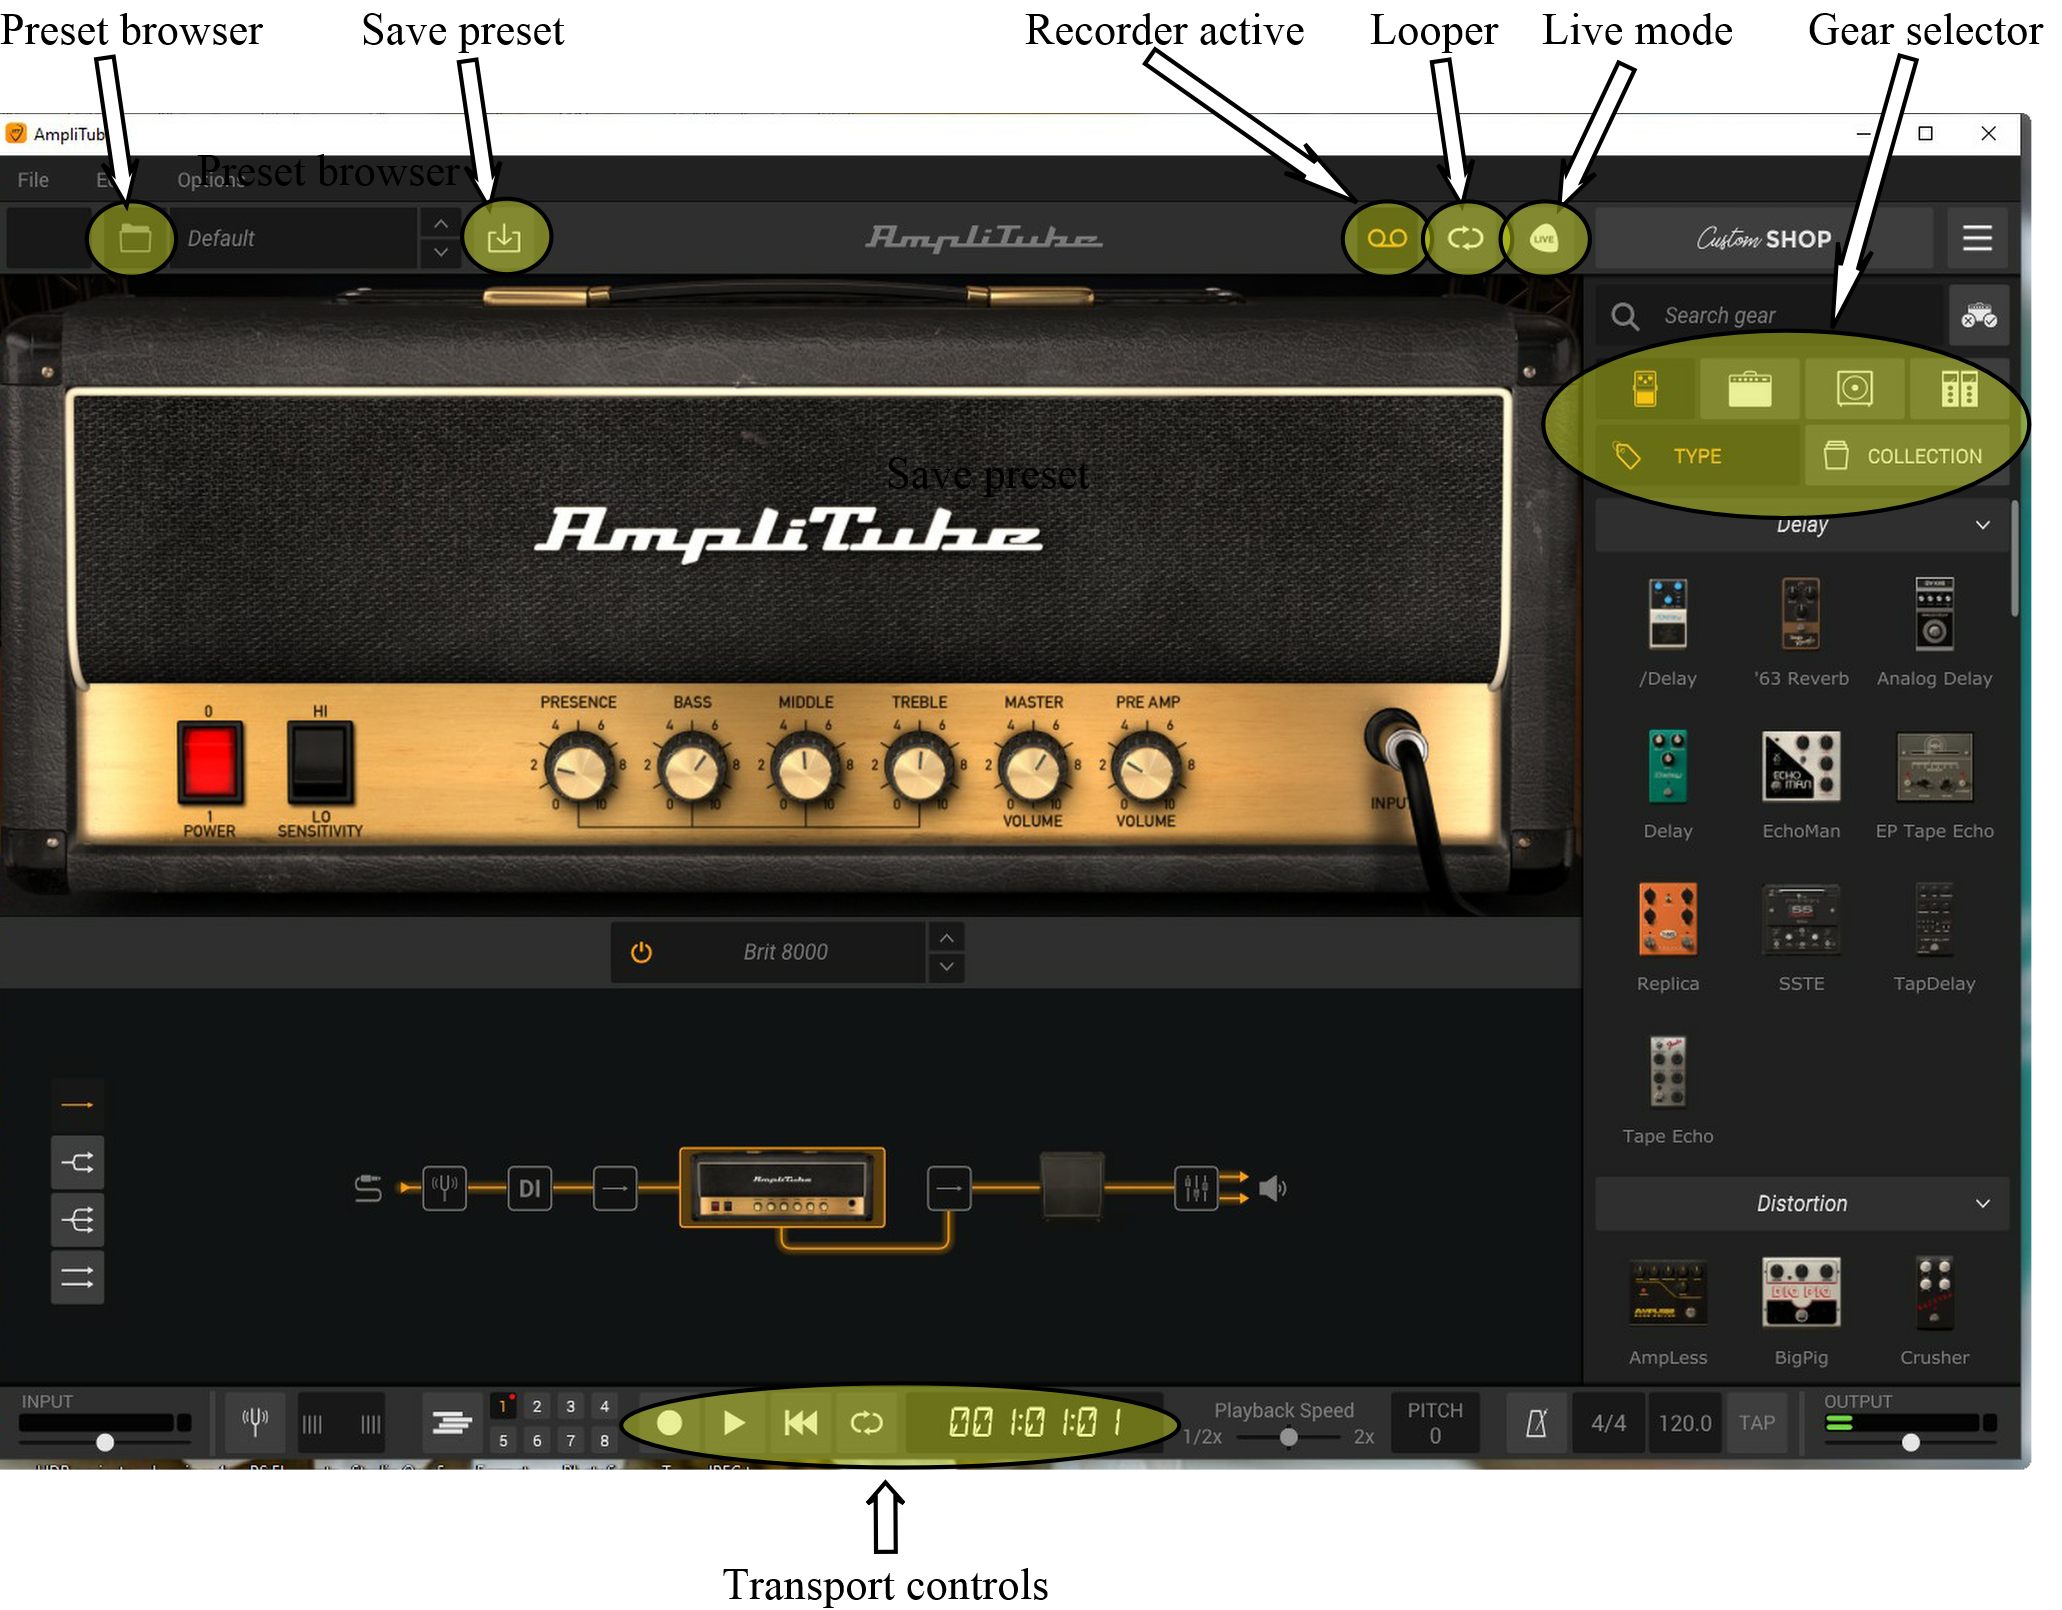
LET'S GET STARTED – STAND ALONE IMPLEMENTATION
Opening up give us the default screen

Opens with a default British 8000 amplifier model. No effects, just a matched cabinet. Which sounds great, by the way.

With a more powerful and modern processor lower buffer sizes will be possible, but the latency at 256 is not causing me any issues.
Going to the gear selection menu, the first icon is for stomps, the second for amplifiers, the third for the speaker cabinet, the last for post effects.


Please note the main mixer icon is in the signal path.
Self explanatory and a very useful addition.
Self explanatory and a very useful addition.
Let's have a look at the modules:
The Recorder:
IK says this is an 8 track DAW. This, in my opinion is rather stretching the truth. It does have 8 tracks, some basic EQ and cut/paste/loop/playback speed functions. There is no VST support, so you cannot add a drum VST. To get a drum track you have to have an audio file you can import.* It is also possible to import a music track to jam along to.
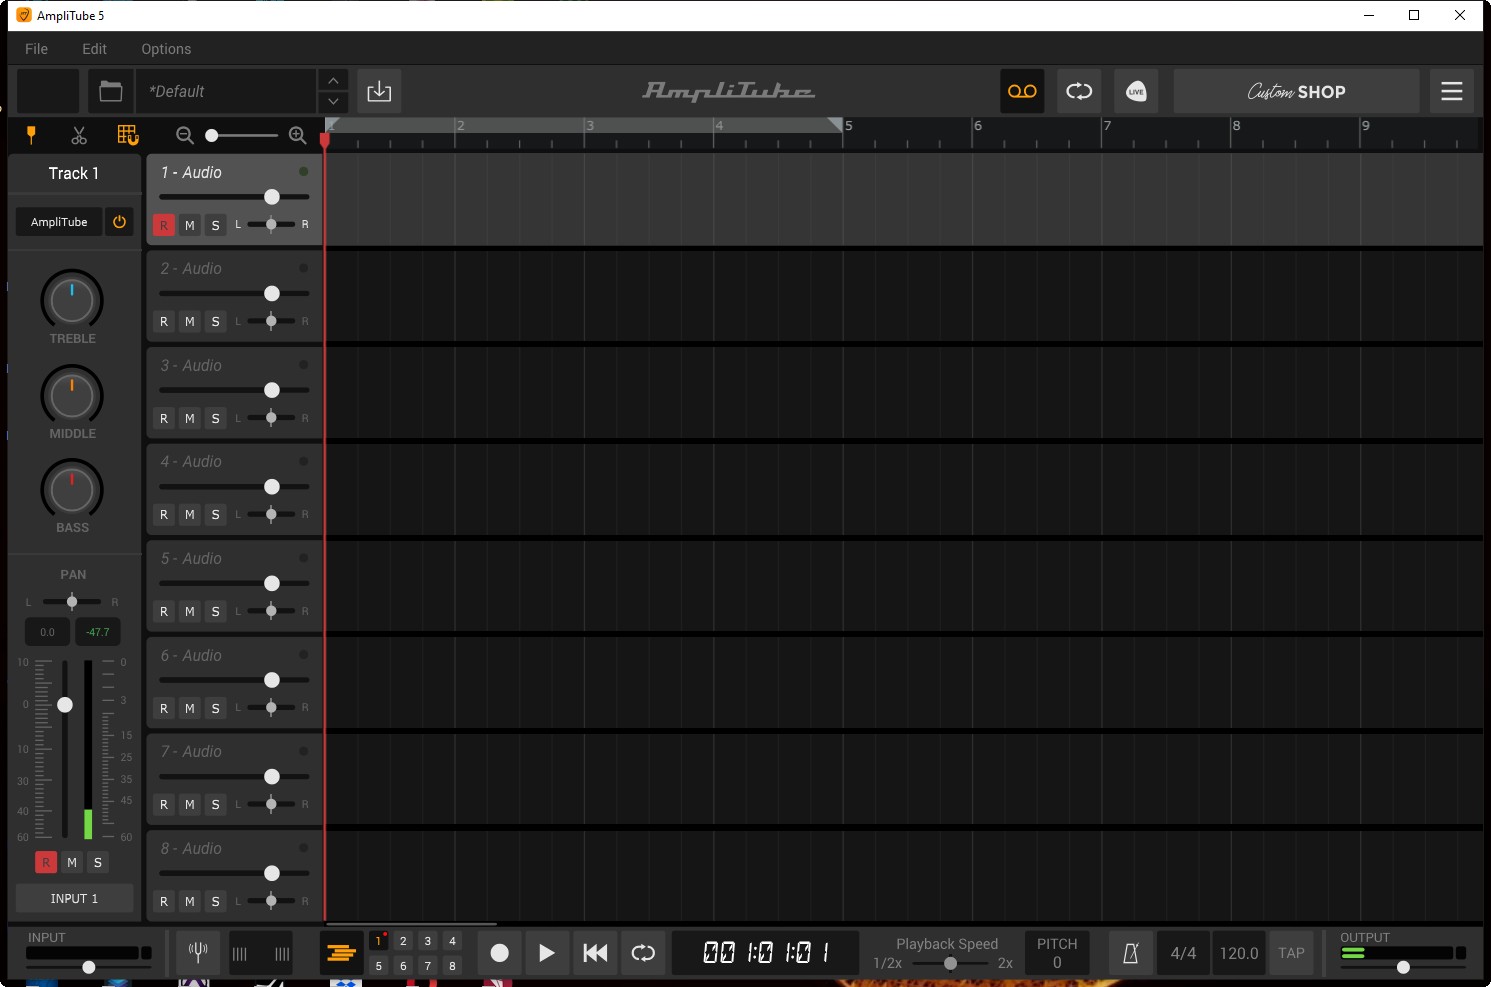
My advice is to get a free DAW if you want to do any recording, there are many to choose from including Studio One Prime (the one I would choose), Audacity, LMMS. If you have an audio interface the likelihood is that a free DAW came with it, so use that instead.
*Unless I have completely misread the manual – but I could not see any way to have anything but audio tracks.
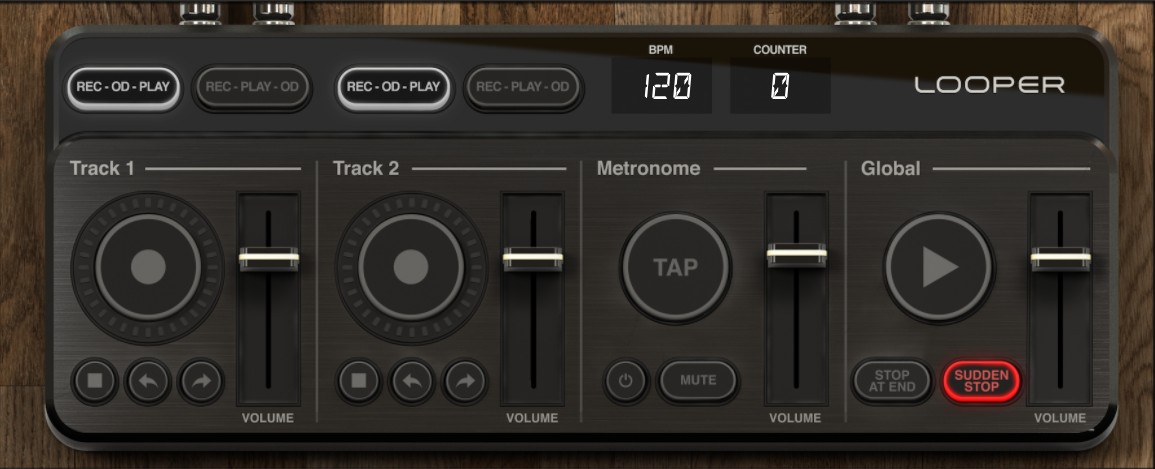
The Looper: This looks like it could be a lot of fun, but realistically requires a MIDI floor controller, something I do not possess, so I cannot comment any further.
Live: Store your favourite presets for instant recall during live performance or rehearsal. Again requires a MIDI floor controller, so no further comment.

Before we move on, I'm sure by now you will have noticed how dark and, well, gloomy, the new UI can appear at times. As I mentioned in the preface there have been comments criticising the dark hues of the UI and in particular the difficulty of actually seeing some on the sub menu items. I know that there have been requests for a lighter theme as an option, and I am sure that would be most helpful for a lot of users.
GUITAR:
The sheer number of pieces of gear available in the MAX version! As well as four different signal path templates that allow you to place almost everything in any place or combination you desire, there are far too many stomps, amps, cabs, and studio effects to mention individually. More than 400 all together, and when you add in the speaker driver, microphone, and room mixing choices the better part of your life could be taken up with refining your patches.
So I am not even going to try to list them all. Suffice it to state that every eventuality I can imagine is covered.
What I have done I go through many of the preset patches - all of the AmpliTube 5 and AmpliTube 5 CS ones.
As you can guess there are some outstanding tones in there, to use as they are are, or more likely to use as a starting point for your own tweaks.
I did notice that using some of the high gain presets with coils split or single coil were spectacularly noisy*– a few presets have a signal to noise ratio of approaching zero – seriously the amp noise is louder than the guitar signal. In these cases the Epiphone performed the best with coils split (although I understand that technically the Epiphone coil splitting isn't using one coil completely separated from the opposite winding), followed by the Schecter and the Harley Benton Fusion which were each drowned out by the amp noise in single coil configuration.
*They're not needed, there is plenty of capacity for very high gain amplification without using these.
I have been able to make some comparisons with Positive Grid's Bias FX2 and also, of course, with Cubase's VST Amp rack and Studio One's Ampire. It's very obvious that AmpliTube 5 is more sophisticated than any of these, in particular the Studio One offering. These other three do, of course, have some good useable tones in their presets.
Bias FX2 - while Bias FX is another quite expensive plugin/standalone emulator it is roughly half the price for an equivalent AmpliTube 5 package (even less when on frequent sale) although the expansion packs seem to me to be a little pricey as well as not really necessary. It is nowhere near as complex or flexible as AmpliTube 5 though, for instance having only two potential signal paths, a more pedestrian UI that can only be resized to 125% or 175% of default, and four cab microphones to choose from among many other specification shortfalls. I do not think that there is a huge difference in practical terms to how good either of them sound, each have their strengths and weaknesses but overall I would say AmpliTube 5 sounds somehow smoother. As a plugin BIAS is always outputting a lower volume than it's peers unless the microphones are adjusted, and the amplifier gain and master controls seem a bit on/off at times. AmpliTube 5 is streets ahead in terms of sophistication and tweakability; there is a lot more to play with and it is far more attractively packaged.
VST Amp Rack – I mention this only because I do have Cubase Pro 11. Only comes with Cubase and can only be used in that DAW, so not portable and no use at all if you haven't got either Artist or Pro Cubase and they are quite expensive. The next to least sophisticated of the emulators, but it nevertheless sounds good, and because it is simpler it is less demanding to customise if limited compared to AmpliTube 5. Very useful if you have no other amplifier modelling, has some very useful presets and the bass amp emulations are IMO excellent. Good enough in the absence of anything more realistic and flexible.
Ampire in Studio One. Only OK if you have nothing else. The base version of AmpliTube 5 is infinitely better.
BASS GUITAR:
As you would expect far fewer amplifier models for bass guitar, 15 in AmpliTube 5 MAX. 8 of these, however, are various Ampeg simulations. Only one of them is a simulation of a make of head I actually use – Trace Elliot. Unsurprisingly neither my my Ampeg Portaflex 500 or Laney R500H are included. It is a pity there are no offerings from Markbass, Eden, Darkglass or Ashdown.
AmpliTube 5 (as did AmpliTube 4) knocks Studio One's Ampire out of the park – there is simply no comparison. I'm more ambivalent about the comparison with Cubase's VST Bass simulator. The latter is nowhere near as sophisticated, like the guitar offering, having only 7 bass head models (including Eden) as opposed to the 15 available in AmpliTube 5 MAX. There is a 'but' for me though. I still have 2 Trace Elliot heads; although the Amplitube 5 Trace simulation has the highs it is a little lacking in the low end with the RB414 passive bass to my ears without fiddling with it – not a fault the Cubase emulation has. With the active basses I would say AmpliTube 5 is perfect.
Although here we have the classic conundrum – AmpliTube 5 is so sophisticated that you can for all intents and purposes get whatever sound you want. Don't forget, as mentioned in the guitar section, there is fully featured room and microphone mixing panel enabling almost unimaginable variation. So if you are the kind of person who will tweak a sound until it is just so, there is no arguing with the fact that Amplitube 5 is a dream come true. This, is, of course, especially useful for live performance.
My favourite amongst the bass emulations is the Gallien and Krueger MB150S, although the in house AmpliTube branded bass amps sound very good IMO. Some of the presets using the AmpliTube 5 basis solid state preamp are very satisfying. As a bass player, if I were going from the CS or free version of AmpliTube 5 I would purchase that Gallien Kreuger to go with it if I was looking for a larger variety of tones.
To conclude this section: as with the guitar emulations the bass amps just sound better than they did in AmpliTube 4, although, of course, that remains a perfectly good application.
I have no hesitation is recommending AmpliTube 5 in one variant or another for bass players or recording bass guitars no matter which of the DAWs I have tested it with you might have.
Be in no doubt though, the bass guitarist is nowhere near as well served by AmpliTube 5 as the common or garden electric guitarist.

CONCLUSION:
The more I use it the more I like AmpliTube 5. The MAX version is absolutely awesome.
If you want to have a whole universe of sounds at your whim, think about getting an iRig Stomp controller, AmpliTube 5 MAX (or AmpliTube 5 which can be bundled with a iRig controller - €349.99 plus tax and save money), your laptop and a full range combo like a Harley Benton* G212AFR - €285 including VAmplitube . Realistically for what you would pay for a decent 100w mono combo you can have it all. Quite tempting?
For Reaper (which has no amp simulation built in) and Studio One (where the built in simulations are very limited) AmpliTube 5 it is an obvious top of the range add-on for recording. In Cubase the decision is a little less clear cut, but if you want stunning accuracy in your emulations and extremely fine and sophisticated control over your sounds the it is the thing to go for.
I do not think MAX is for everyone. The SE or 5 versions seem to me to be the ones that would be the optimal choice for most users. Any additional gear models you fancy can be tried before buying in the new version of Custom Shop. Better value unless you simply must have everything.
Things used in this review:
PCs: 8 year old desktop AMD FX8, 16gb ram, laptop ASUS VivoBook 15, 6gb ram
DAWs – Cubase Pro 11, Studio One 5 Professional, and Reaper 5.99
Monitoring – Behringer Truth B2031A near field, AKG K240 headphones
ASIO Interfaces – Steinberg UR22, Behringer UMC404HD
MIDI controllers – Akai MPC Element, Novation Impulse 61
OS – Windows 10 Home
Guitars - Epiphone Prophecy GX, Schecter Banshee Diamond Extreme, Harley Benton* Fusion Pro ll HH, Ibanez SG300EB, Harley Benton* RB414, and Marcus Miller M7 V2
PA – Mixer (run flat) Behringer Xenyx X2442, amp Behringer KM750, and the Box PA302s*.
*Yes, I do get a lot of stuff from Thomann, what can I tell you?
System Requirements
AmpliTube is a 64-bit application and requires a 64 bit CPU and Operating System.
Mac® (64-bits)
Minimal: Intel® Core™ 2 Duo (Intel Core i5 suggested), 4 GB of RAM (8 GB suggested), macOS 10.10 or later. 3 GB of hard drive space.
Requires an OpenGL 2 compatible graphics adapter.
Supported Plug-in formats (64-bit): Audio Units, VST 2, VST 3, AAX.
Windows® (64-bits)
Minimal: Intel® Core™ 2 Duo or AMD Athlon™ 64 X2 (Intel Core i5 suggested), 4 GB of RAM (8 GB suggested). Windows® 7 or later. 3 GB of hard drive space.
Requires an ASIO compatible sound card.
Requires an OpenGL 2 compatible graphics adapter.
Supported Plug-in formats (64-bit): VST 2, VST 3, AAX.
Internet connection is required as all of the Custom Shop operations are web based.
Views: 6132
AmpliTube Joe Satriani®
From IK Multimedia, a new Amplitube® 4 collection – Joe Satirani
"A Time Machine of Tone."
From IK Multimedia, a new Amplitube® 4 collection – Joe Satirani. "A Time Machine of Tone." Tested reviewed by Howard Worf, for us here at Guitarist Guild.
I stress that the opinions following are mine alone and based upon my personal experiences in a home studio set up. Testing has been done exclusively within either the stand alone PC version or through a DAW as a plugin. All brand names are the copyright property of the brand owners.
Conclusion: and absolutely excellent suite of classic rock presets with three brilliant amplifier emulations, classic stomps and a variety of cabs to play with. If you loved the 80s/90s rock sounds then this is definitely for you.
The collection comprises a suite of gear:
Amplifiers:
Satch VM - customised Marshall® 4 channel
SJ50 - customised Peavey® 5150®
Boston 100 - model of Tom Scholz X100
Cabs:
Satch Green - 69 Marshall® with 4x12 20w Greenback Celestions®
Satch 60 - 60 Marshall® with 4x12 GT12T-75 Celestions®
Boston Sym - Model of the cabinet simulation from the Boston 100
Stomps:
Satch Wah - Vox® Big Bad Wah
Satch Distortion - Boss® DS-1
Satch Overdrive - Boss® OD-1*
Tube Overdrive - Model of JS's modified Chandler® OD with 12AX7 valve
Satch Octave - Model of Ultimate Octave pedal
. . . and dozens of presets based on these, 20 in the discography section and 29 in the general
section.
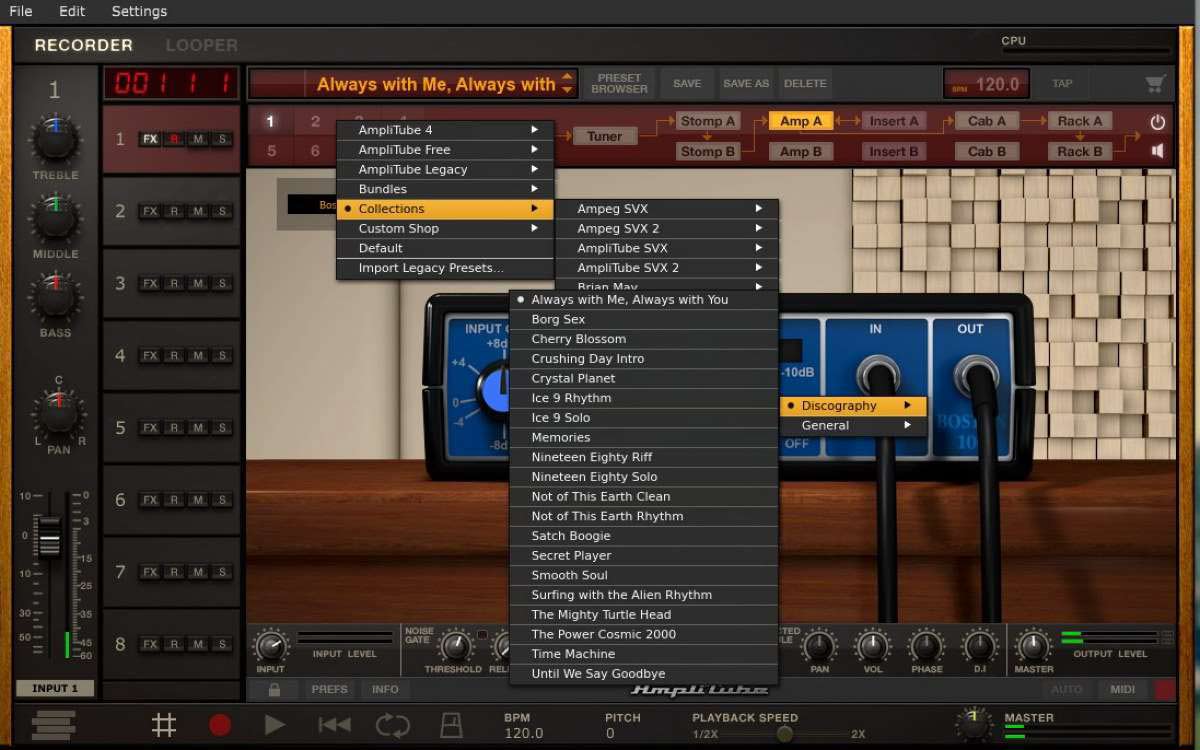
Here is a shot (from stand alone interface) of the list of general presets:
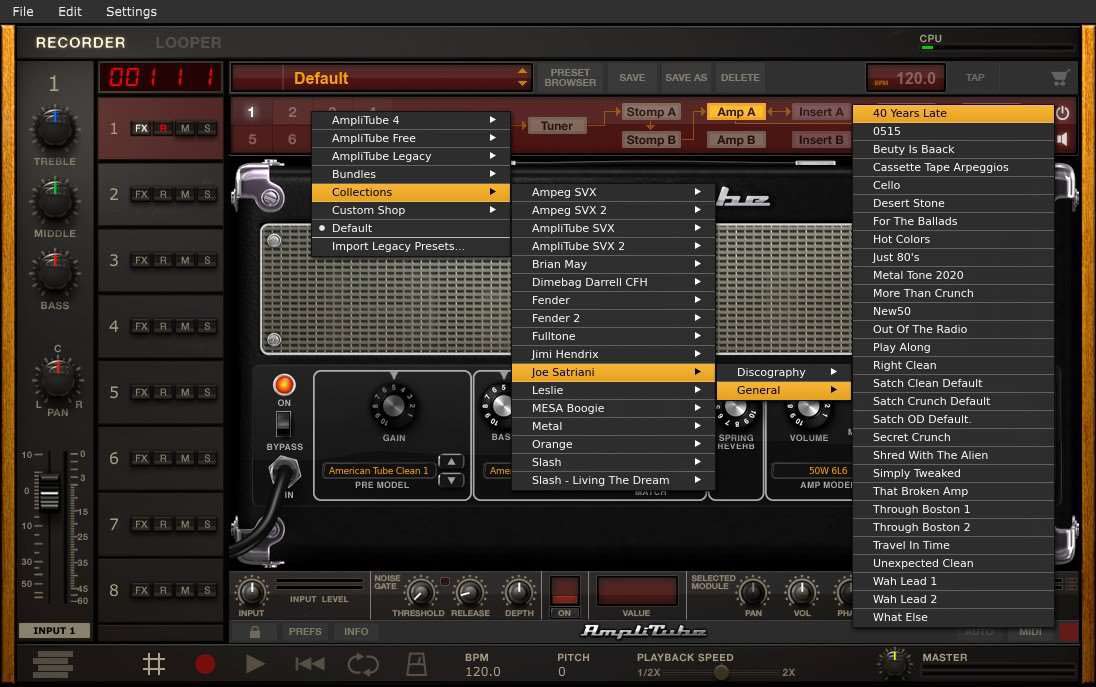
Here is a shot (from stand alone interface) of the list of discography presets:
I feel I need to mention is sample rates. The minimum for the stand alone app is 256 samples and I could not get either of my USB interfaces to work without breaking up at anything less than 512 samples, and even that was not particularly stable. Luckily within a DAW (I've tested with Cubase Pro 10.5 and Studio One 4.5) the lower sample rate of 256 works without issue, but, of course those of you who do not have an 8 year old PC, or have a lightning or firewire interface might find that higher sample rate latency is not an issue in the stand alone version. Unfortunately my firewire interface has shuffled off this mortal coil.
Rather than add a lot of images to this review, please visit IK Multimedia for their gallery of gear pictures:
https://www.ikmultimedia.com/products/satriani/index.php?p=images
It's an automatic slide show that will take you through everything that is available in the collection.
As my main live rock band playing times were the late 80s and 90s, albeit as a bass guitarist, you would expect me to be very happy with the suite of sounds offered as presets, and perhaps even more so by the inclusion of two hot amps and one legendary one. And you would be correct. The presets are (for the most part) fat and sonically full, thick even, with a marked emphasis on multiple delays – just the way I like it. Perfect for melody and solos as well as punching rhythms. The clean sounds are equally impressive. My current absolute favourite preset is Smooth Soul from the discography collection. Lovely sound, especially with the Schecter.
Playing just with the amps has been the highlight of this review process for me, especially the hot Marshall® and 5150®. Quite literally hours of fun.
A few additional and very important things to mention. The collection comes wrapped in the latest
version of Amplitube®. This gives the user some rather splendid features in the stand alone version.
These include:
• Perfect integration with IK's range of audio interfaces and floor controllers allows for
instant recording and performing in the studio or on stage with full programming**
• 2 track recorder
• Import of audio files
• SpeedTrainer - speed up or slow down imported tracks without affecting the pitch – the perfect tool for practicing or learning your favorite riffs and solos.
And in the DAW version there is automation and BPM synchronisation.
I have not been able to ascertain what is packaged with the Amplitube® 4 wrapper as I am a long time owner of an Amplitube® 4 licence, but I can imagine that you would need at least the Amplitube® Custom Shop installed – this is free – otherwise the price of the collection at €99.99 (+ sales tax or VAT wherever you are) would undercut Amplitube® 4 at €149.99 (+ sales tax or VAT wherever you are).
Conclusion: and absolutely excellent suite of classic rock presets with three brilliant amplifier emulations, classic stomps and a variety of cabs to play with. If you loved the 80s/90s rock sounds then this is definitely for you.
Things used in this review:
Guitars – Schecter Diamond Extreme, Harley Benton Fusion Pro ll HH. Well, it would have been rude to test without Floyd Rose® equipped guitars!"
DAWs – Studio One 4.5 Pro, Cubase 10.5 Pro
Monitoring – Behringer Truth B2031A near field, AKG K240 headphones
ASIO Interface – Behringer UMC404HD, Steinberg UR22
MIDI controllers – None
OS – Windows 10 Home
* I used to own one of these 'legendary' pedals. Mine never sounded as good as this emulation.
** Alas, I do not have access to any of these wondrous devices.
https://www.ikmultimedia.com/products/satriani/
System Requirements
AmpliTube is a 64-bit application and requires a 64 bit CPU and Operating System.
Mac® (64-bits)
Minimal: Intel® Core™ 2 Duo, 2 GB of RAM (4 GB suggested), macOS 10.7 or later.
Supported Plug-in formats (64-bit): Audio Units, VST 2, VST 3, AAX.
Windows® (64-bits)
Minimal: Intel® Core™ 2 Duo or AMD Athlon™ 64 X2, 2GB of RAM (4 GB suggested), Windows® 7, Windows® 8 or Windows® 10. Requires an ASIO compatible sound card.
Supported Plug-in formats (64-bit): VST 2, VST 3, AAX.
Views: 13909
AMPLITUBE BRIAN MAY COLLECTION REVIEW
From IK Multimedia, a new Amplitube 4 collection – Brian May.
"Tone That Will Rock You."
Amplitube 4 collection – Brian May Tested reviewed by Howard Worf, for us here at Guitarist Guild.
I stress that the opinions following are mine alone and based upon my personal experiences in a home studio set up. Testing has been done exclusively within either the stand alone PC version or through a DAW as a plugin. All brand names are the copyright property of the brand owners.
The collection comprises a suite of gear:
Amps and Cabs:
BM 30 which emulates the classic three Vox AC30 setup
BM DK emulation of a custom amplifier made by John Deacon
2x12 BM 30 Blue – emulation of Vox AC 30 cab with 2 Celestion Alnico Blue drivers
2x12 BM 30 H70 – emulation of Vox AC 30 cab with 2 Celestion G12H drivers
1x6 BM DK – emulation of 1x6 custom John Deacon cab

Guitar:
Red Special – emulation of the famous 3 pickup handmade guitar
Pedals:
Star Gate – emulation of a generic classic noise gate
Treble Booster – emulation of KAT Treble Booster
May Wah – emulation of rack mount Dunlop Cry Baby
Fox Phaser – emulation of the fOXX Floor Phaser

Presets:
It doesn't seem like a lot but together (and in conjunction with other effects already built in to Amplitube 4 – rack graphic EQ, delay, reverbs etc) you get a very diverse and pleasing set of sounds. These are available through the collections presets menu, Brian May. The presets are representative of decades of famous Queen and Brian May recordings.

And, of course you get the gear to play with as you like in conjunction with either basic Amplitube sets or any other gear or collections you have purchased.
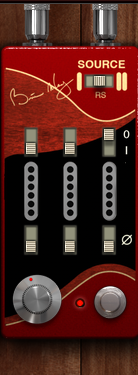
It would be tempting to think that the sounds could be relatively easily duplicated with one of the many VST amp racks out there, but it's not. The reason for this is that many of the sounds use an emulation of the three AC30 set up May is famous for (2 of the three swept left/right with selectable built in chorus, delay, or harmoniser, the third clean and centred). Then there is the Red Special itself with the Burns Tri-Sonic pickups connected in serial (not parallel like most guitars) and with each pickup having a phase selector. This latter is as important to the dynamics of the sound set as the three amp rig. It is very important to set the source selector to the correct choice for the guitar you are using, single coil (such as a standard Stratocaster), Red Special (if you have one) or humbucker (such as a Les Paul). If using a hybrid guitar, such as my Schecter, make sure you are either using the humbucker or single coils (or split humbucker). The default is the middle position which seems odd as Red Specials are not the most common guitars out there. Although as the Red Special is an entirely single coil loaded guitar there is not a huge amount of difference between the settings I and RS.
The whole package has been very carefully designed to help the user replicate Brian May's tones from the 70s onwards – the treble booster for example is switchable through the decades.
Be sure to download and read the AmpliTube Custom Shop Gear Models.pdf from the My Products section of the IK Multimedia website – detailed and clear instructions on how to use the gear and amplifiers in this collection.
CONCLUSION:
I am a great fan of IK Multimedia – I have had and used Amplitube since version 3*, and Amplitube 4 is my go to guitar rig modeller. This is very accomplished suite of custom gear and amplifiers with a quite unique and special set of sounds. I particularly like the 3 AC30 chain, sounds excellent even on its own. There are dozens of presets in the collection, all of them interesting and authentic. To my ears it sounds better if used with a guitar with single coils – in my tests the Squier Stratocaster with Wilkinson Hot single coils and custom wiring sounded the best. A close second was the Harley Benton Victory (which with alnico humbuckers just sounds really good all of the time). That is, however, just my personal opinion, it sounded good with all the guitars I used, and, of course, everything is adjustable. A couple of quibbles. The Amplitube window itself is not scaleable which means that some of the parameter adjustments, in the harmoniser settings of the AC30 amps for example, are tiny, and the CPU load seems to be quite high even with no audio input. I would like to see the AC30 amp combination and cabs available as separate purchases from the Custom Shop, as I not sure that the pedals add a great deal of individuality in themselves. The collection does seem a little expensive – the Slash collection by comparison is €59.99.
Things used in this review:
Guitars – Schecter Diamond Extreme, Epiphone Prophecy Plus GX, Harley Benton Fusion Pro ll HH, Harley Benton Victory Plus Vintage, Fender Squire Stratocaster Affinity with custom wiring and hot single coils.
DAWs – Studio One 4.5 Pro, Cubase 10 Pro
Monitoring – Behringer Truth B2031A near field, AKG K240 headphones
ASIO Interface – Behringer UMC404HD
MIDI controllers – None
OS – Windows 10 Home
System Requirements
AmpliTube is a 64-bit application and requires a 64 bit CPU and Operating System.
Mac® (64-bits)
Minimal: Intel® Core™ 2 Duo, 2 GB of RAM (4 GB suggested), macOS 10.7 or later.
Supported Plug-in formats (64-bit): Audio Units, VST 2, VST 3, AAX.
Windows® (64-bits)
Minimal: Intel® Core™ 2 Duo or AMD Athlon™ 64 X2, 2GB of RAM (4 GB suggested),
Windows® 7, Windows® 8 or Windows® 10. Requires an ASIO compatible sound card.
Supported Plug-in formats (64-bit): VST 2, VST 3, AAX.
Amplitube 4 collection – Brian May
All Amplitube For PC and Mac
Views: 8704
MODO BASS REVIEW
"The first physically modelled electric bass"
An in-depth look at IK Multimedia's MODO BASS software. Tested reviewed by Howard Worf, for us here at Guitarist Guild.
From IK Multimedia, the creators of MODO Drum is MODO Bass.
I stress that the opinions following are mine alone and based upon my personal experiences in a
home studio set up.
CONCLUSION:
I am a great fan of IK Multimedia I have had and used Amplitube since version 3*, and really enjoy using Philharmonik. I was seriously impressed by the brilliant GUI of MODO Drum, the ease of customisation and sheer punchiness of the sounds. If you do not play bass or know someone who does then this is a good fantastically customisable substitute, perfect for keyboard players. I did find some of the tones a little artificial sounding at times, but overall in a mix for all practical purposes indistinguishable from a physical bass guitar. Even if you do play bass, there is a world of extra tones available here for music production. I am, however, surprised that there is no groove library.
At the time of writing MODO Bass is available for €129.99 + sales taxes (ie VAT)
* for added realism, run MODO Bass through Amplitube (or any other bass amp modeller) add it as a VST insert to the MODO Bass channel in your DAW.
INTRODUCTION:
MODO Bass, now in version 1.5, was the first MODO instrument and is entirely based on sophisticated modelling. The aim is to replicate a whole host of bass guitars, playing styles, electronics and so on. As with MODO Drum there is a very clear and intuitive GUI and an almost limited soundscape for modifying bass guitar sounds. Also as with MODO Drum there is a stand alone app as well as the usual VST and AAX versions for use with you chosen DAW (64 bit only).
MODO is IK Multimedia's branding for modal synthesis, allowing real time parameter changes as the instrument plays, so you can easily adapt a bass guitar sound to your track.
I have been playing bass guitar for more than 50 years. I have 5 basses, including both 4 and a 5 string Ibanez Soundgear basses which are the model for the Japan Bass in MODO Bass. So I can make a tone comparison between that model and the real things. I am, on the other hand, ham fisted when it comes to playing a keyboard. Playing a bass line on a guitar is second nature to me, on a keyboard exactly the opposite requiring considerable concentration. I find it much easier to play MODO Bass on my Akai MPC or the pads on my Impulse. Just a thought for those of you who are, like me, not entirely comfortable using a keyboard. You could, of course also use a step sequencer . .
OK, let's get to looking at the product. The START SCREEN
The start screen (scaleable in stand alone mode) opens with the first ten bass guitar models displayed across the top. There are four more models available by scrolling to the right, including my reference Japan (Ibanez) bass. There are only two basses with maple necks, both Fender models.
Beneath the graphical representations of each bass are 6 buttons which access the additional parameters to shape your sound. You will also notice the yellow triangle and drop line over the representation of the guitar body. This represents the point of the plucking/picking strike on the strings, and can be simply dragged to the desired point. Close to the bridge the string has a thinner sound, played at the end of the fret board the sound is fuller and more rounded as the string is vibrating more freely.
Having chosen a bass model as you starting point, and yes they do all sound different as you would
expect, we can then move on to the PLAY STYLE.
Here we choose pluck, pick or slap, well you can read the rest of the buttons. All, I hope pretty obvious. I always check the open strings box to 'on' my personal preference is to use an open string when the opportunity arises for the extra clarity of note.
The slap stroke option is interesting it defaults to 'auto' with a high threshold. I found that this setting rarely gave a slap tone, almost always a pull sound. When we get to the CONTROL section you will see that it is possible to change stroke style as you play using a designated MIDI control parameter: a note out of bass guitar range is ideal for this. Notice that with the slap play style selected you cannot move the stroke point I am guessing this normally because slap is played close to the neck.
The play style chosen changes the available options in the stroke and touch settings, emulating for example a player who finger picks hard, soft or somewhere in between, or picking down, up or alternating.
You get the idea, lots of changes and tonal variation to be found here.
Next up is STRINGS.
For me this is possibly the most powerful section in MODO Bass. If you have ever played bass you will know that the action, string type, gauge and age are so important in the creation of tone. Higher action heavier gauge more depth, newer round wound strings much brighter, In this section you can also change to a 4, 5, or 6 string model (even the Fedora model). NB drop obviously only works with 4 string models, dropping to low D. Update, version 1.5.1 now works on 5 string models to drop B to A
In this section you can also set the tuning reference.
Now to the ELECTRONICS page.
Here you have the choice of an almost infinite number of options. OK, not infinite probably, but mind bogglingly huge. You can choose to change the bridge and/or neck pickups from every one of the models, move them relative to the body and each other, just click and drag the chosen pickup. Change relative volumes (as you can with the physical controls on most basses), and choose active or passive modes. In passive mode there is on simple tone control, in active three parametric virtual knobs with both fixed frequency and Q.
Hours of fun.
The penultimate area is AMP/FX
It opens with the amplifier selection showing (unless you have left it on one of the other sub menus)
To choose an amp model simply click on the picture of the one you want, or use the drop down menu. There is a choice of what resembles two different Ampeg models, the flip top valve 15" cab (B15N), and an SVT transistor with a 4x10 cab.
The controls are different for each amplifier no graphic only on the solid state model, punch and harmonics on the valve model for example.
Notice in the image above the signal path is set to default. There are, of course dozens of presets (not mentioned at all in the manual surprisingly is it because I also have Amplitube 4 installed I wonder?)
Here is shot of the Finger Bass preset flyout:
As a plugin you can run through Amplitube or another amp modeller by turning the amp control to zero and use the DI out to control the send volume. You can, of course mix the amp and DI signals if you want to and experience the dynamic of two amplifiers and effects chains running together without additional routing in your DAW. You could in this way set up a kind of bi amp sound. Very useful.
To access the 4 slot pedal board to edit the effects simply click on the pedal board in the GUI.
The available pedals are:
- Octaver
- Distortion
- Chorus
- Comp
- Delay
- Envelope Filter
- Graphic EQ
Lastly we come to the CONTROL page.
You can ignore this at your peril! This is where you can use your midi controller to add player dynamics, glissan do, vibrato etc. The controls are already mapped to various keys and control change commands.
The commands can be mapped to off, control change, keyswitch, pitch wheel, aftertouch or learn depending upon the parameter being controlled. So you can create a new control map customised to your preferences and save it for later use.
Worth an honourable mention is the fretboard and keyboard graphic that you can see in all windows except CONTROL where only the piano keyboard is displayed..
From the manual: "The piano keyboard shows the note range of the bass plus the assigned keyswitches for the real time control of the playing style and performance. The Bass fretboard shows the position of the left hand behaviour system which determines where the note is played (which fret and which string). This system positions the left hand as close as possible to how a real bass player would play and also allows keyswitches to force the use of a determined fret or string (on the right side of the piano keyboard)"
As a bass guitarist I'm not entirely convinced by that last statement; I find it much better to play the notes with my right hand and allocate all the player controls to the left of the keyboard where the pitch wheel is located. But as I have pointed out, I am not a competent keyboard player, most of whom I would imagine play bass lines with their left hands.
SOME THOUGHTS: Using my Ibanez basses plugged straight into a DAW without any processing at all I am happy to report that the emulation is good. Obviously all real instruments vary in sound absolutely from one day to the next, and indeed the 4 string and 5 string do themselves sound slightly different, otherwise what would be the point?
I would like to have seen one more bass type included a fully customisable blank slate instrument where a bespoke bass could be constructed from (in addition to the range of electronics already provided) a choice of body wood, neck wood, fretboard wood (or plastic), scale length bridge type and material. Additional strings, nylon flat wound. I'm pretty sure just about every possible bass guitar sound is reproducible from within MODO Bass, but this might make it a bit easier to target the sound for experienced bass players. But we are not the target market, we just pick up a bass and play it . .
A groove library would IMO be a useful addition.
BUT wot, no fretless?
CONCLUSION:
I am a great fan of IK Multimedia I have had and used Amplitube since version 3*, and really enjoy using Philharmonik. I was seriously impressed by the brilliant GUI of MODO Drum, the ease of customisation and sheer punchiness of the sounds. If you do not play bass or know someone who does then this is a good fantastically customisable substitute, perfect for keyboard players. I did find some of the tones a little artificial sounding at times, but overall in a mix for all practical purposes indistinguishable from a physical bass guitar. Even if you do play bass, there is a world of extra tones available here for music production. I am surprised, however, that there is no groove library.
At the time of writing MODO Bass is available for €129.99 + sales taxes (ie VAT) https://www.ikmultimedia.com/products/modobass/
* for added realism, run MODO Bass through Amplitube (or any other bass amp modeller) add it as a VST insert to the MODO Bass channel in your DAW.
Things used in this review:
DAWs - Cubase 10 Pro, Studio One 4.5 and Reaper 5.99
Monitoring - Behringer Truth B2031A near field, AKG K240 headphones
ASIO Interfaces - Steinberg UR22, Behringer UMC404HD
MIDI controllers - Akai M PC Element, Novation Impulse 61
OS - Windows 10 Home
System Requirements
MODO BASS is a 64-bit application and requires a 64 bit CPU and Operating System.
Mac® (64-bits)
Minimal: Intel® Core™ 2 Duo, 4 GB of RAM (8 GB suggested), macOS 10.9 or later.
Supported Plug-in formats (64-bit): Audio Units, VST 2, VST 3, AAX.
Windows® (64-bits)
Minimal: Intel® Core™ 2 Duo or AMD Athlon™ 64 X2, 4 GB of RAM (8 GB suggested), Windows® 7, Windows® 8 or Windows® 10. Requires an ASIO compatible sound card.
Supported Plug-in formats (64-bit): VST 2, VST 3, AAX.
Views: 11784
MODO DRUM REVIEW
"Give your drum tracks a whole new life"
An in-depth look at IK Multimedia's MODO Drum software. Tested reviewed by Howard Worf, for us here at Guitarist Guild.
From IK Multimedia, the creators of Amplitube and Philharmonik to name but two, is MODO Drum.
I stress that the opinions following are mine alone and based upon my personal experiences in a home studio set up.CONCLUSION:
This is an excellent modelled acoustic drum application. Quality modelling, real time kit element editing, first rate groove library, more kits in the package than its rivals, and above all a wonderful clear, intuitive and easy GUI. A word that is frequently heard in the promotional videos is 'punchy', and it is certainly that. Snap up your copy while the introductory pricing is still available.
So, let's get to it. MODO Drums enters a market where there are already a number of established competitors, to name a few: EZ Drummer, Addictive Drums, Groove Agent (although this last one is much more aimed at the EDM user). There are also a couple of very usable, albeit very limited in comparison, free drum VSTs, MT Power Drummer being probably the most popular. There are, of course, simply dozens of free EDM VSTs, but these are not in the market for realism – not substitutes for real acoustic drums.
In order to succeed it will have to have something particularly special the others do not offer. IMO that most important something is the extremely clear, powerful and easy to understand GUI, but it is not the only something. Read on . . .
So what do you get? Here are some of the main features:
New modelling engine (really quite something . .) which gives
On the fly adjustment of:
• Drum diameter
• Drum depth
• Drum profile
• Damping
• Tuning
Snare type and tension
Different sticks and beaters
Sympathetic resonance control
10 drum kits
More than 1400 MIDI patterns
Comprehensive room parameterisation
Infinite velocity layers and round robins – each hit is generated and controlled by the modelling engine so that no two hits are ever exactly the same - impressive
Effects – EQ, dynamics, distortion, reverb/delay, and modulation
Resizable GUI
In no particular order then the key selling points for me are:
• The GUI – scalable, clear, and most importantly the most intuitive one I have ever experienced on a drum VST. The GUI is significantly ahead of the pack IMO, although AD2 and EZ Drummer are not particularly difficult to use either. On the other hand the Groove Agent interface seems to have been designed by sadists and makes it almost unusable.
• 10 kits in the package – most rivals offer only 2 or 3 (with the purchase of additional expansion packs necessary to add to the basic kits), Groove Agent has 3 acoustic kits and dozens of alternative EDM kits. The quality of the bundled kits in MODO Drum is excellent, so absolutely no worries in that regard.
• The MIDI patterns, accessed through the superb UI, are amazingly good – IMO quite possibly the best suite available in this kind of package. Super easy to navigate and find the pattern you want. It really does make the others look a little lacking, even though the filtering concepts are broadly similar MODO Drum just make it more intuitive.
Unlike some of its competitors which rely exclusively on sampled drum sounds, MODO Drum has a whole new and exclusive synthesis engine, for both drums and cymbals. The range of acoustic kits provided coupled with the enormous customisation available means you really can find that right sound for your project. The diameter and depth of every drum model can be adjusted to get the exact sound the user wants. The shell profile, damping and tuning can also all be adjusted on the fly.
Let's have a look at the GUI:
The start screen:

The app opens with the Studio kit by default, and from here you can easily choose from the 8 displayed, or scroll to the end for the other 2 kits.
A click on the settings gear icon give access to an interface controlling brightness (general), MIDIcontrol of drum hit position (control), and audio/midi (unsurprisingly labelled audio/midi)


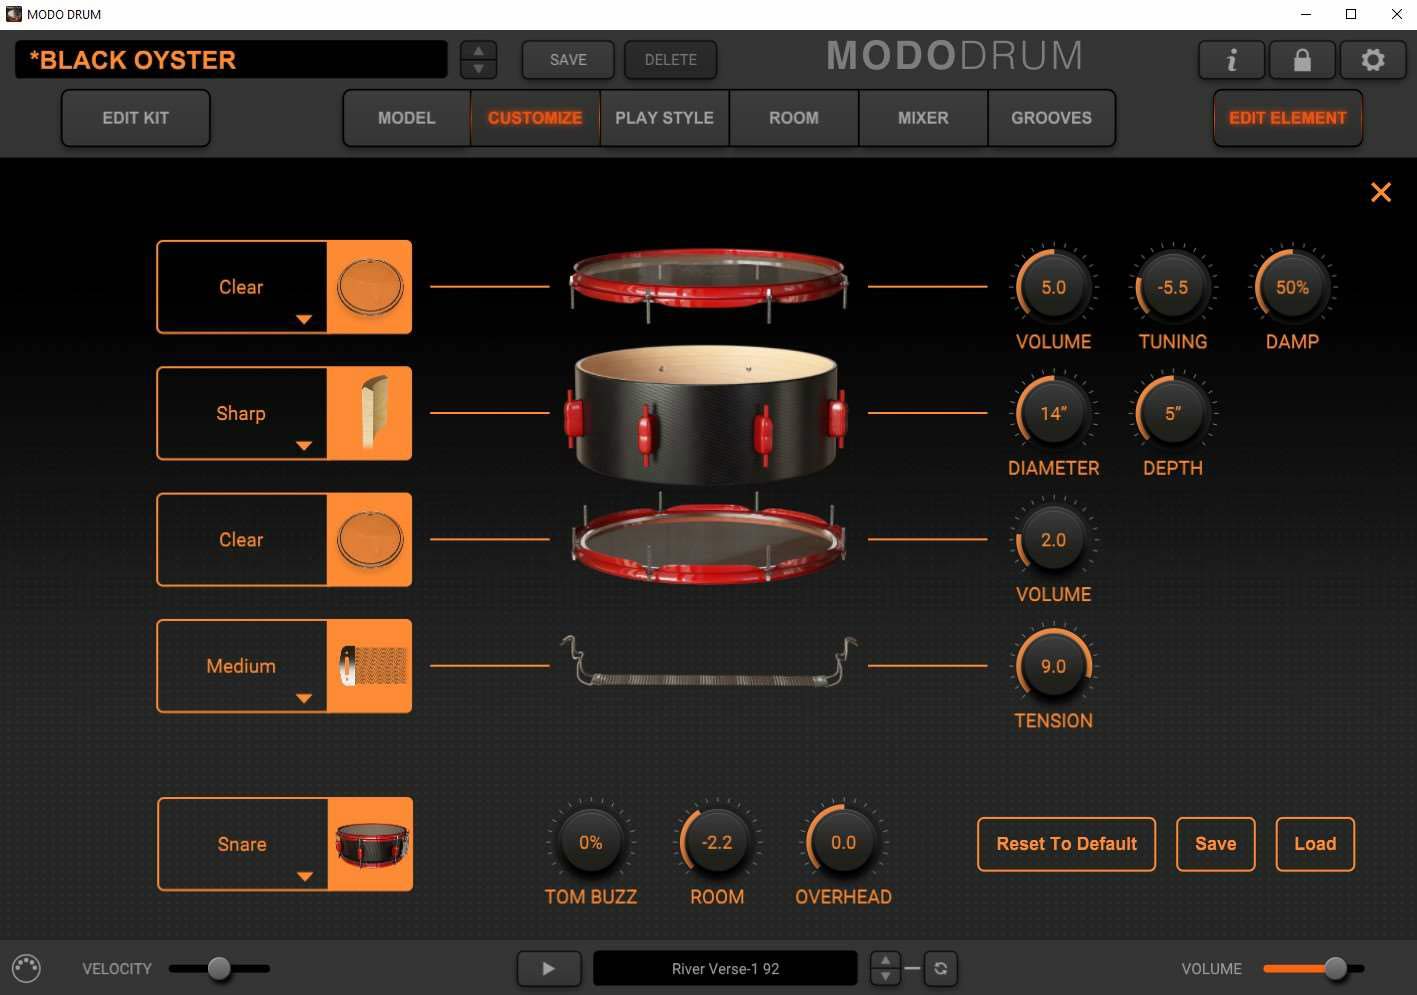
Next there is the 'Customize' screen which enables swapping of kit components between all of the available kits. For example you can take the snare from one kit, the bass drum from another and so on. The customised kit can then be saved as a user preset. For example

So far, so good. How about we make a completely bespoke drum kit?
Click on the drum or kit component you want to rework, then on the 'Edit Element' button. Depending upon which element you have chosen to edit, you will be presented with an enormous ability to make changes. And all of them on the fly, in real time as you either play the individual drum or are running a pattern.
Not being a drummer I do not have the expertise to set parameters without listening to the effect the changes have on the chosen drum, but rest assured that the editing is at once both subtle and audible. And, as a theme that runs throughout this software, the GUI is so clear, so easy to understand, and so easy to use effectively.
When you have finished making adjustments, just save the customised drum and then the kit.
Next is 'Play Style', a really interesting fine tuning arena. Here it is possible to assign the hit areas for left and right hand strikes of the snare and toms, or the kick drum technique, as well as bespoke sticks and beaters. The left and right hit areas can be adjusted, and as you would imagine the MIDI map for MODO Drums has trigger notes for each of the left and right hits.
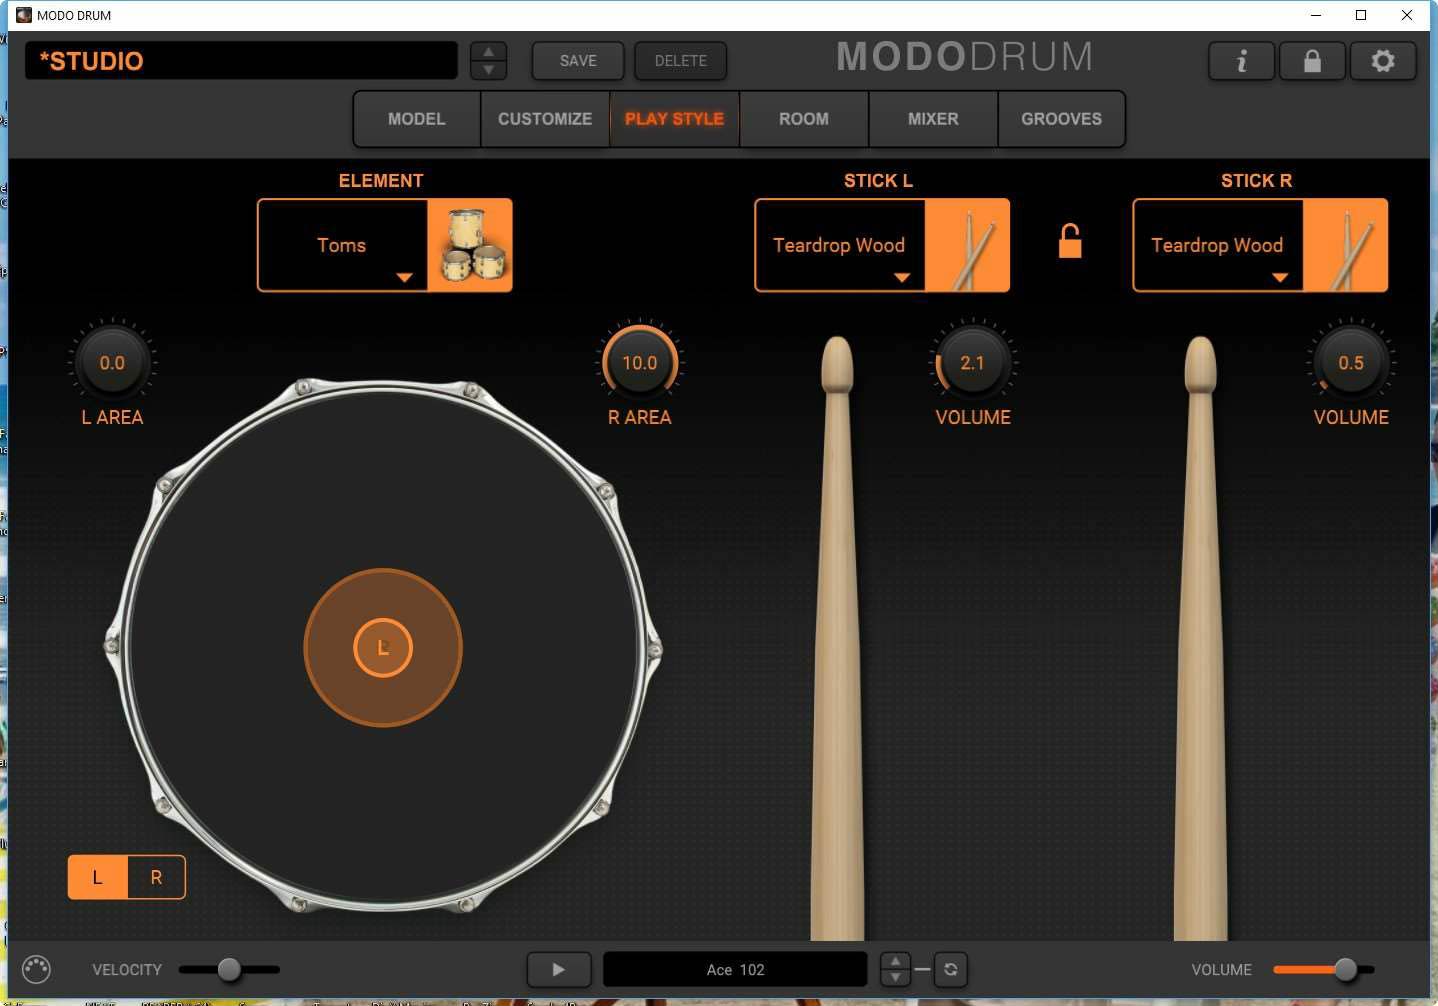


You could, for simplicity assign the same trigger not to both the left and right hits if you wish using an external MIDI map – it does not seem to be possible to customise the map within MODO Drums: my guess is that this is to make sure that no internal conflicts arise, and does make a deal of sense.

Next along the top row is 'Room'. This gives access to 10 different ambient environments. The degree of resonance from each environment can be adjusted using the flyout mixer tab. There are no direct adjustments for each environment, but as with the choice of kits it is really quick and simple to find the right basic sound you are after.


Then we come to the 'Mixer' tab. This is where a serious amount of extra tweaking can be done, if you are so minded. There are 2 independent effects sends for each piece of the drum kit, and up to 4 effects from the rack for each drum channel – in addition to the channel EQ. The 19 effects are:
• EQ - Parametric EQ
• Dynamics: Compressor, Comp 2A, Comp 76, Gate, SL Compressor
• Distortion: Clipper, Big Pig. Crusher, Distorion
• Reverb and Delay: Plate, Room, Inverse, Hall, Delay, Tape Delay
• Modulation: Phaser, Chorus, Flanger
The mixer rack also enables routing to additional busses or individual DAW tracks


Incidentally the symbol next to solo and mute that looks like a 'phi' on its side (Ø) is for phase inversion.
Lastly accessed from the main screen is the 'Grooves' page.
This is a perfect example of excellent software design. I repeat this GUI overall is IMO the best I have seen on a drum VST, if not all VSTs. It is a breeze to find a phrase from the more than 1400 patterns included.

Having found the phrase you want, simply drag and drop it into your DAW. Unlike Amplitube 4, for example, there is no sequencer/recorder built in to the stand alone version. This is not a big deal.
A couple of caveats - Version 1.0.0 does not play entirely well with Cubase. There is a pending update due for release shortly, which fixes the bug that prevents pattern drag and drop into a Cubase track. There is a workaround: you can manually drag any grooves from the C > Program files > IK Multimedia > MODO Drums > Grooves.
There are no Latin rhythm instruments in the package. Perhaps a later add on?
The big disappointment for me is that installation requires a PC with AVX support. Alas my laptop is rather old and has a Pentium processor – plenty for Reaper and amplifier control apps, but I cannot install MODO Drums and so have been unable to test with my Alesis DM10 kit which I can use with Addictive Drums (I know I said I am not a drummer – this is true – why I have this is a rather long and boring story).
CONCLUSION:
This is an excellent modelled acoustic drum application. Quality modellinig, real time kit element editing, first rate groove library, more kits in the package than its rivals, and above all a wonderful clear, intuitive and easy GUI. A word that is frequently heard in the promotional videos is 'punchy', and it is certainly that. Snap up your copy while the introductory pricing is still available.
More information and promo videos at www.ikmultimedia.com/products/mododrum
Things used in this review:
DAWs – Cubase 10 Pro and Reaper 5.99
Monitoring – Behringer Truth B2031A near field, AKG K240 headphones
ASIO Interface – Steinberg UR22
MIDI controllers – Akai MPC Element, Novation Impulse 61
OS – Windows 10 Home
System Requirements
Standalone and 64-bit plug-in. Requires a 64 bit CPU and Operating System
Mac® (64-bits)
Minimal: Intel® Core™ i5 with support for AVX instructions, 8GB of RAM (16 GB suggested), 20GB of available hard-disk space, macOS 10.9 or later. USB port (3.0 suggested).
Supported Plug-in formats (64-bit): Audio Units, VST 2, VST 3, AAX.
Windows® (64-bits)
Minimal: Intel® Core™ i5 or equivalent with support for AVX instructions, 8GB of RAM (16 GB suggested), 20GB of available hard-disk space, Windows® 7, Windows® 8 or Windows® 10. ASIO compatible sound card. USB port (3.0 suggested).
Supported Plug-in formats (64-bit): VST 2, VST 3, AAX.
Requires an OpenGL 2 compatible graphics adapter.
Pages: [1] 2